Module Features
Before we dive into the different signal types in the Grid, let’s first talk about the features available in the Grid modules themselves.

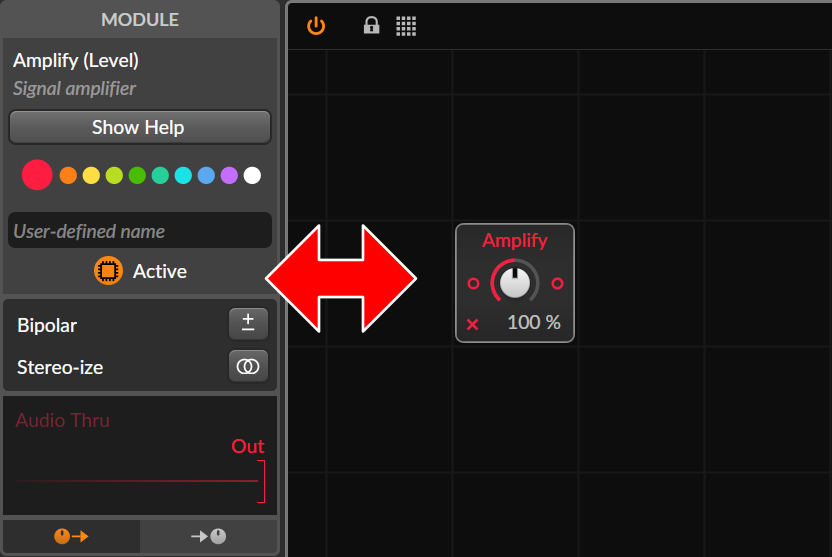
Take the Amplify module as an example - it’s a very basic module at first glance. But when you select it in the Grid by clicking on it, you’ll notice more options in the Inspector panel on the left side.
- Category: It shows that Amplify belongs to the Level category, along with a short description labeling it as a signal amplifier.
- Help Button: Clicking this opens the help section for more details on how the module works. Very important if you need some hints.
- Color Selector: You can change the module’s color if you don’t like the default red.
- User-Defined Name: You can rename the module for clarity, like changing Amplify to Louder or anything that fits your workflow better.
- Active Button: This mutes or disables the module. When disabled, the signal passes through the module unchanged, which is useful for A/B testing or temporarily deactivating parts of a signal chain.
- Bipolar Mode: This allows the module to amplify both positively and negatively, meaning you can invert signals or reduce their amplitude below zero.
- Stereo-ize: This enables inverse control for the left and right channels (left gets louder, right becomes quieter and vice versa), useful for creating stereo effects.
Sine Oscillator - a complex module with pre-cords #

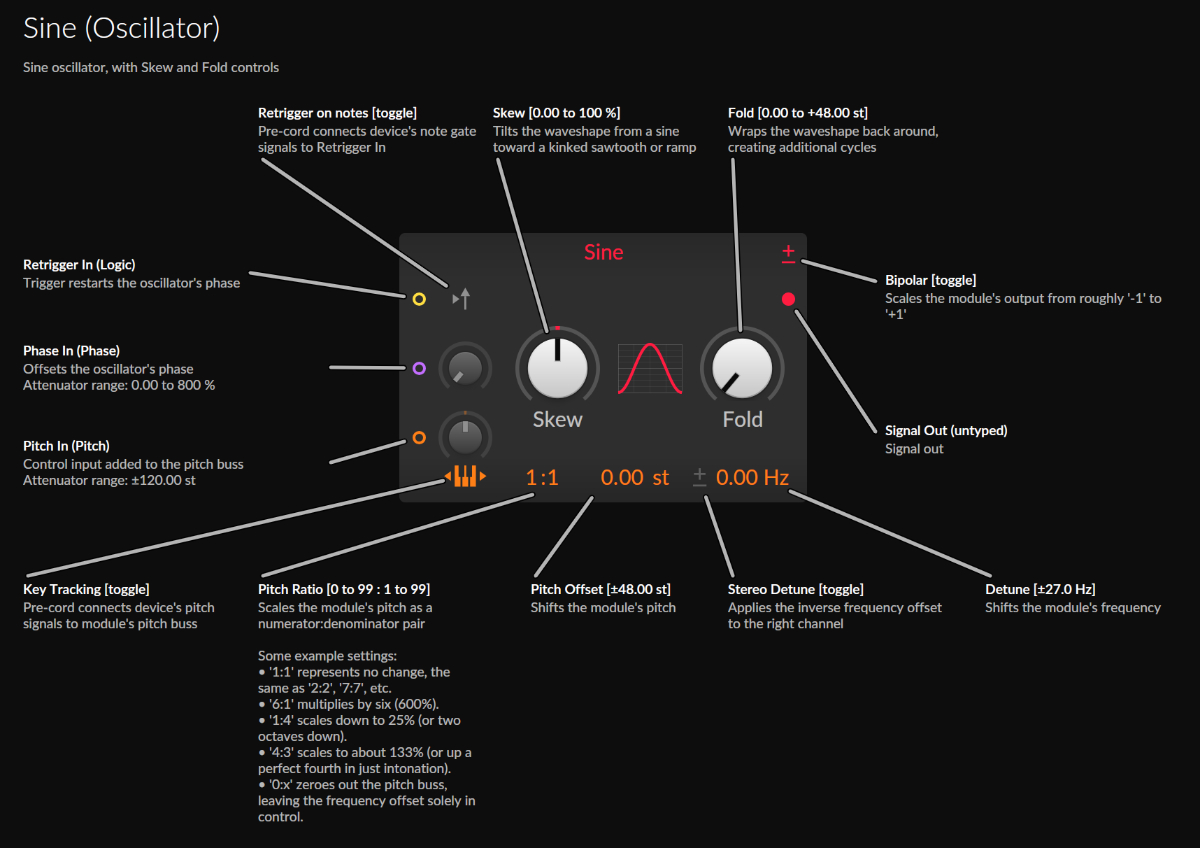
The Sine Oscillator module in Bitwig’s Grid is a bit more complex than basic modules like Amplify since it has many controls and settings. Let’s break it down step by step, with a focus on the important pre-cords (pre-connected shortcuts).
Pre-Cords (Pre-connected Controls) #
pre-cords are built-in shortcuts designed to simplify common connections without needing extra cables. They make patching faster and cleaner by automatically linking common inputs.
-
Retrigger on Notes (Top Left Button):
- When enabled, the oscillator restarts its waveform (phase reset) each time a MIDI note is triggered (like pressing a key on the keyboard or drawing a note in the piano roll).
- When disabled, the oscillator runs freely, never resetting - useful for continuous, evolving sounds.
-
Key-Tracking Toggle (Bottom Left Button):
- This connects the incoming pitch from your MIDI notes directly to the oscillator’s pitch without manual wiring.
- If you play a C note, the oscillator will play the frequency corresponding to C.
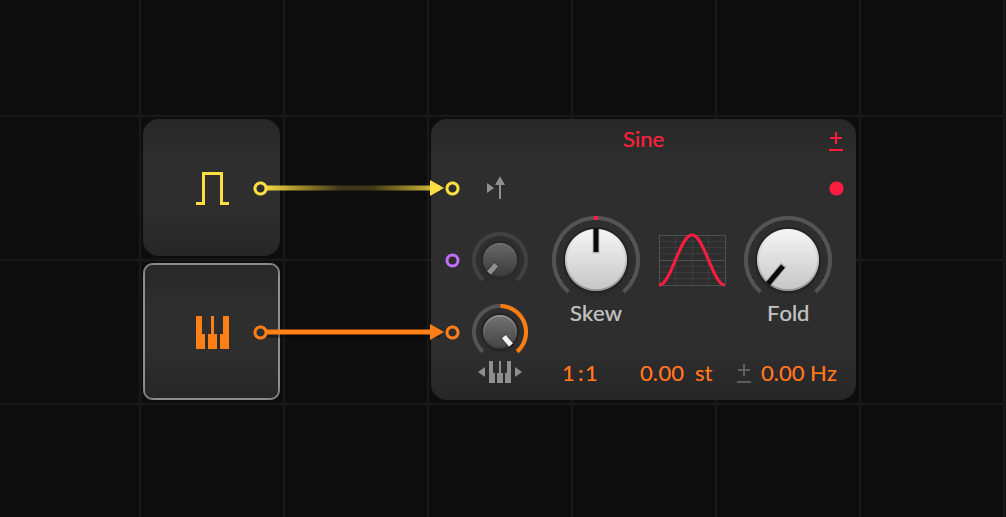
These pre-cords save you from manually connecting MIDI inputs like Gate and Pitch, making them essential for faster patching. Without Pre-cords, you’d have to manually use multiple modules to bring Pitch and Gate information into the oscillator, as shown in this image:

Essentially, what’s happening here is the same as enabling Retrigger on Notes and Key Tracking without additional modules, just a much simpler shortcut.
However, be careful when creating generative patches. In those cases, you often don't want external Pitch and Gate data influencing the patch since everything is generated internally. Accidentally playing your MIDI keyboard while working on a generative patch could send unwanted pitch information to multiple oscillators, leading to unpredictable or 'off' results.
Input Jacks and Manual Controls #
between the Retrigger & Pitch pre-cords are three input jacks for more advanced routing if you want to override the pre-cords:
- Retrigger Logic (Gate Input):
- Allows you to manually send a gate signal from anywhere in the Grid instead of relying on the default MIDI input.
- Phase Input:
- Lets you control the oscillator’s phase position directly, useful for phase modulation (PM) or frequency modulation (FM).
- Pitch Input:
- Provides a way to manually send a pitch signal, separate from the Key-Tracking Precord.
Tip: Each input jack also has a small Amount Knob next to it, controlling how strongly the incoming signal influences the oscillator.
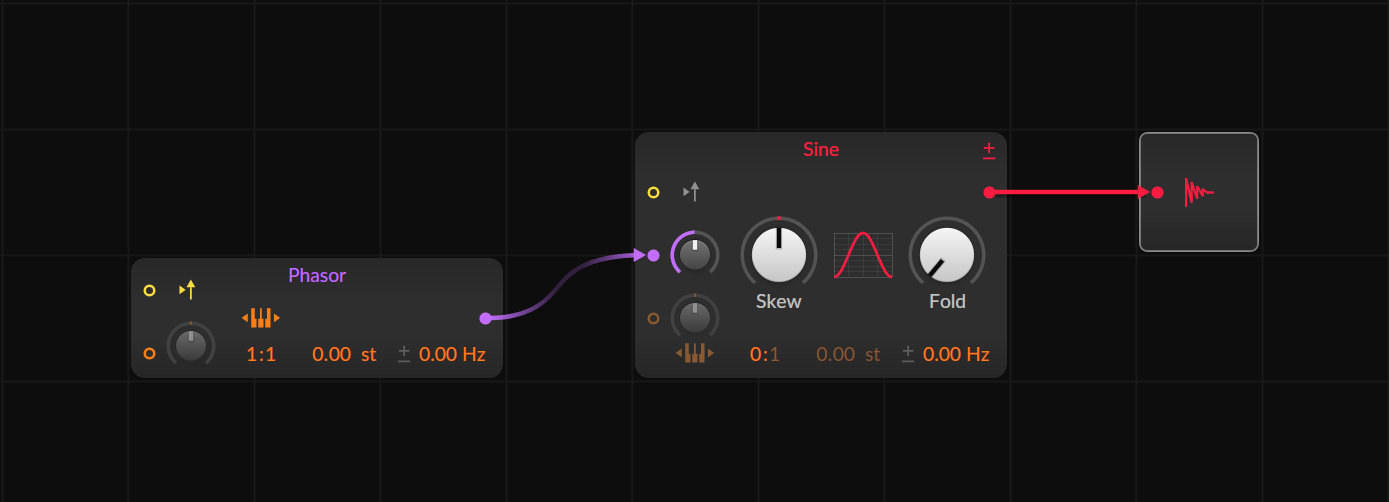
In this image, we completely disable the internal phase generation, which normally relies on Pitch and Gate information, by setting the Ratio to 0:1. You’ll notice that the Pre-cords for Key Tracking and Retrigger on Notes are grayed out, meaning they’re no longer available since the internal phase generator is now inactive.
Instead, we can use the Phase In input to feed an external phase signal into the oscillator. In this example, the phase signal is generated by a Phasor module, which still has active Pitch and Retrigger pre-cords.
The advantage of this setup is that you can insert additional modules between the Phasor and the Sine Oscillator to manipulate the phase signal before it reaches the oscillator, though you don’t have to. But, you can!

Frequency and Pitch Controls #
- Pitch Ratio (1/1 Control): Adjusts the frequency ratio for tuning.
- 2:1 doubles the frequency (one octave up).
- 1:2 halves the frequency (one octave down).
- 3:1 tripples the current frequency (one octave and a fifth up)
- 0:1 disables the internal phase generator!
- Pitch Offset (Semitones): Detunes the oscillator in semitone steps (one note up/down).
- Pitch Offset (Hertz): Detunes the oscillator in Hz for finer micro-tuning.
- Stereo Detune Button (+/- Button):
- When enabled, it detunes the left and right channels in opposite directions (great for wide stereo effects).
Waveform Shaping Controls #
- Fold: Adds wavefolding, altering the shape for richer harmonic content.
- Skew: Warps the sine wave asymmetrically, also adding harmonics.
- Bipolar/Unipolar Toggle: Switches the output range:
- Bipolar: Ranges from -1 to +1.
- Unipolar: Ranges from 0 to +1.
Key Takeaway: pre-cords Simplify Patching #
The pre-cords are essential because they save you from manually wiring common MIDI inputs. They appear not just on oscillators but also on other devices like LFOs and modulators.
By enabling just a couple of buttons, you can instantly connect essential inputs without drawing cables - perfect for a cleaner workflow!
Pop-Up Editors #
Some modules, like the Wavetable Oscillator, Curves LFO, or the Segments Envelope module support pop-up editors. When you click directly on the graphic in the center of the module, an overlay appears. This lets you do things like edit the envelope, swap out the wavetable file, or access other features.
Basically, some modules have a second, hidden menu that opens up with a click. In some cases, it even launches the browser, for example, to choose a sample or replace a wavetable file in the Wavetable Oscillator.
▶ Next Lesson: Signals
◀ Previous Lesson: Grid Modules
▲ Bitwig Grid Course Overview