Using the DSEQ3 by TB Pro Audio to Enhance Your Audio Signal.
Tutorial | Sep 28, 2022
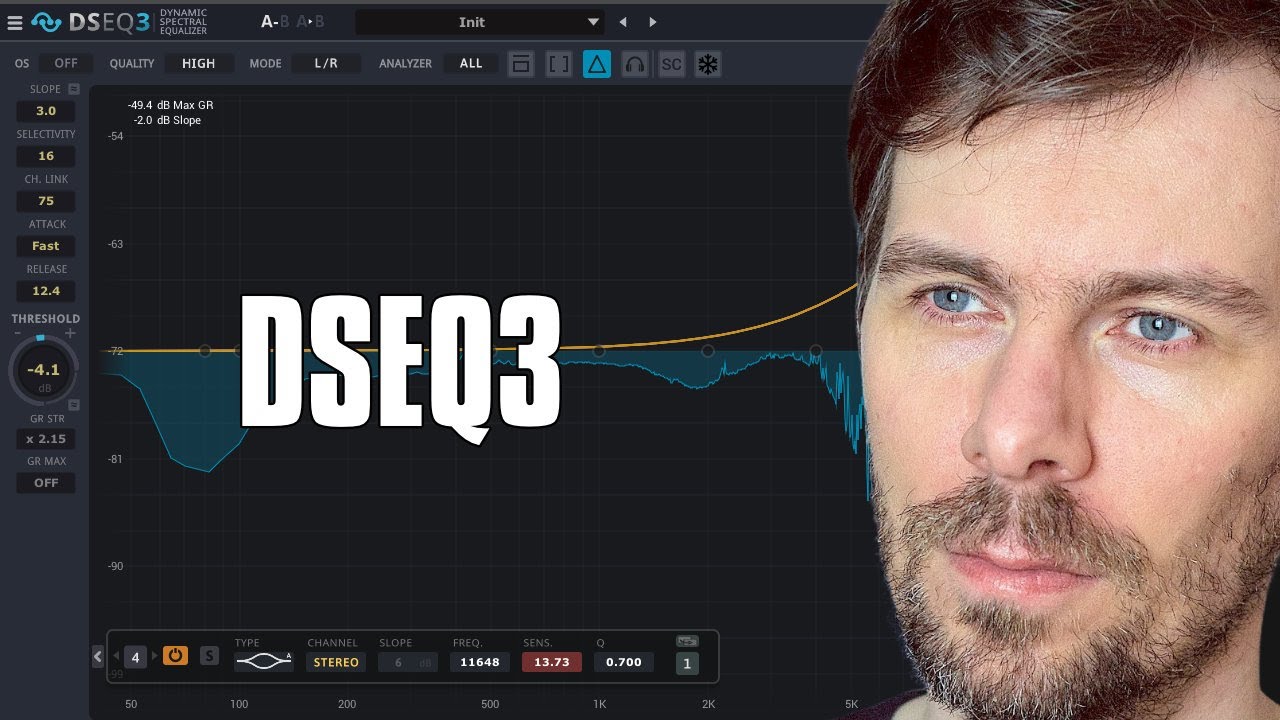
In this video, I talk about the DSEQ3 by TB Pro Audio, a dynamic spectral equalizer. I explain how the pre-filter helps to filter out low frequencies, and how the analyzer catches what’s above the threshold line and reduces it with the compressor. I also explain how the selectivity works, as well as the slope and the over sampling. I demonstrate how this can be used in mastering, and how it can be used creatively for sound design. Finally, I recommend trying out the demo version available on the website.
You can watch the Video on Youtube - support me on Patreon
Questions & Answers #
Maybe you dont watch the video, here are some important takeaways:
What does the DSEQ3 by TB Pro Audio do? #
The DSEQ3 by TB Pro Audio is a dynamic spectral equalizer, which is used to reduce harsh frequencies from the audio signal. It works by using a pre-filter to filter out the low frequencies, and then an analyzer to analyse the signal and reduce the frequencies that exceed the pre-set threshold. It also has a compressor setting, gain reduction strength, selectivity and over sampling, as well as a slope setting to adjust the shape of the analyzer.
What is the pre-filter used for in the DSEQ3? #
The pre-filter is used to filter out the low frequencies and only allow the high frequencies to be driven into the analyzer. This allows the analyzer to then focus on the higher frequencies, such as harsh frequencies from hi-hats, vocals and other audio elements.
How can the DSEQ3 be used for mastering? #
The DSEQ3 can be used for mastering by using a dB meter to set a reference value, such as -10dB loss, and then using the DCQ to catch all the high frequencies or the harsh frequencies
Transcription #
This is what im talking about in this video. The text is transcribed by AI, so it might not be perfect. If you find any mistakes, please let me know.
You can also click on the timestamps to jump to the right part of the video, which should be helpful.
[00:00.000] Hey folks, welcome back to another video.
[00:02.800] Today it's about the DSEQ3 by TB Pro Audio and this one here is a dynamic spectral equalizer
[00:09.880] and some people ask me for a video about this because I use this sometimes in my videos
[00:15.280] and I mostly use this on the master to reduce some harsh frequencies automatically.
[00:21.520] So it's kind of a filter or an automatic EQ, but I want to show you what this does.
[00:28.580] So the main thing here, the main window is basically a pre-filter.
[00:34.080] The pre-filter means you filter the audio signal before it goes into the analyzer and
[00:39.680] the analyzer then analyzes the signal obviously and do something to the audio signal at the
[00:45.880] end.
[00:46.880] So you don't change the audio signal with this EQ.
[00:50.160] It's only the EQ for the analyzer basically.
[00:56.760] So what I do with the pre-filter most of the time is getting rid of all the low frequencies
[01:01.480] so only the high frequencies are getting catched and are driven into the analyzer.
[01:07.980] So I have this here on the master bus and I go here with the threshold down and you
[01:18.120] can see the analyzer catches only the frequencies in this range.
[01:23.120] It's exactly what I want because when I pull this down more frequencies are getting catched
[01:29.760] also here the bass and the kick and this plugin tries to reduce these frequencies of course
[01:36.760] as you can see which is not what I want.
[01:38.960] I want to have a static kick and sub in my track and only would reduce your harsh frequencies
[01:46.280] from the hi-hats from the vocals or something like this.
[01:50.280] So this is what I do most of the times.
[01:54.040] So the pre-filter decides what goes into the analyzer.
[01:56.680] The threshold then changes what goes over the threshold line and everything that exceeds
[02:02.040] the threshold line is getting analyzed and is getting pushed down by these compressor
[02:09.280] and you can change the overall compressor setting here with attack and release.
[02:13.560] And there's also here gain reduction strength which is probably more like the ratio on a
[02:19.400] normal compressor I don't know.
[02:24.520] And also this works in the spectral domain.
[02:26.880] So you basically have a compressor on each individual frequency, single frequency, right?
[02:33.840] And you can change that each individual frequency is targeted by using here the selectivity.
[02:42.720] So you can switch between soft which is more like an or works like a bandpass filter where
[02:48.360] you have not a single frequencies, you have multiple frequencies surrounding special frequencies.
[02:54.840] So when you have here EQ plus for instance, right, you have a slow curve on the left and
[03:00.840] the right side.
[03:02.840] So the selectivity is basically an EQ factor.
[03:08.560] So instead of having one single frequency, it's much sharper than that because it's a
[03:13.480] spectral compressor or spectral equalizer.
[03:17.240] It's much, much more harsh than that and the soft setting here where we are at the moment
[03:24.680] at zero here is more like, you know, having all the surrounding frequencies also influenced
[03:30.480] a little bit.
[03:31.480] So you get the softer, softer curve for something that gets reduced.
[03:36.880] And you can hear when you pull this up here to sharp, you can hear then it's a spectral
[03:44.000] plug in because you get all these typical spectral effects.
[03:48.320] So maybe let's do this, reduce something, maybe a switch to delta function here.
[03:56.960] And the delta function is basically to hear what's getting removed.
[04:01.160] So it inverts the signal.
[04:03.200] So instead of having the signal with the removed frequencies, you hear the frequencies that
[04:08.640] are getting removed and we get to this later because you can also use this pretty creatively
[04:13.960] in some of the tracks.
[04:17.720] So now you can hear basically that it's a spectral plug in because you can hear this
[04:21.640] kind of phasing sound that is pretty characteristic for all spectral plug ins.
[04:28.800] When you pull this is soft, it sounds more musical, right?
[04:43.000] It's this typical spectral sound where you have individual frequencies influenced and
[04:48.600] it gets the sound.
[04:50.720] So maybe pull this back here again, reduction also to one, which is normally what I use
[04:56.160] most of the times.
[04:58.680] So then we have here also interesting the slope.
[05:01.200] The slope is basically the slope of the of the analyzer.
[05:06.360] So 3.0 is also the perfect slope for pink noise when you go to EQ plus, you have also
[05:13.920] here tilt setting right can dial in 3 dB per octave.
[05:18.360] And this is roughly pink noise, a pink noise curve.
[05:23.520] So if you like to make pink noise mixing or you want to balance your mix down to pink
[05:31.880] noise, then you can use the slope of 3.0, you can also go up here to 4.5, which is more
[05:39.080] relaxed and a bit more warmer sound.
[05:42.640] And this also roughly compares here to the tilt setting of 4.5 dB per octave.
[05:51.160] And with this setting, basically more high frequency is getting catched here by this
[05:59.080] analyzer because you tilt the analyzer or the EQ before you go into the analyzer.
[06:04.960] So this is also nice to know.
[06:08.480] So most of the times I'll go here for 3.0 because I want to catch not that many high
[06:14.400] frequencies anyway.
[06:17.560] So that's also important.
[06:20.520] Then the setting here of over sampling OS is also important when you want to bounce down
[06:25.840] this, you probably don't want to have four times over sampling when you change something
[06:30.360] on a track or when you create a track.
[06:33.640] Also quality here, we can see here we have at the moment 64 milliseconds of latency.
[06:41.200] And if we change this to ultra three, we have 512 milliseconds.
[06:49.160] And you don't want to have this when you play keyboard, right?
[06:52.120] So keep this in mind.
[06:55.320] So to actually use this for my mastering process, what I do is I use a dB meter here on the
[07:02.600] master and the dial in here, the loss I want to have the reference value, which is depends
[07:10.640] on the track.
[07:11.640] So for instance, minus 10 loss, then I analyze the track, maybe switch this off here.
[07:22.400] Then analyze the track, putting here this to the short term loudness max, to the maximum
[07:29.480] loudness value here.
[07:32.000] So this which changes the gain, the gain output.
[07:36.160] Then after this, I'm going into the DCQ catching here basically all the high frequencies or
[07:41.200] the harsh frequencies, putting this to software, slight release time.
[08:05.160] And then basically dialing this down until I think it sounds right or it sounds pleasant
[08:10.560] to my ears, maybe use a B comparison with a different track, something like this, right?
[08:16.240] So I try to basically get rid of some resonances I don't want in my master.
[08:21.840] And then after the DCQ, basically, I'm going to use my elevate, newfangled elevate, multi
[08:32.000] band limiter, also input gain at zero because everything is changed to the dB meter.
[08:37.960] I want to get to this reference value, which is minus 10 loss.
[08:43.240] And everything that peaks, that's not the average signal value of minus 10.
[08:50.320] And some peaks getting much, much louder than that.
[08:52.920] Of course, maybe some of them are getting over zero dB.
[08:57.240] But these peaks, I try to catch basically with the DCQ first, getting this removed here.
[09:04.720] And then the rest of the peaks are getting caught by this limiter.
[09:10.280] So here we have basically a limiter, then there's also a filter bank limiter, then a
[09:17.640] transient shaper, and then at the end there's a clipper.
[09:20.840] But everything is at zero dB as an input or an input gain because everything is driven
[09:26.680] by this dB meter.
[09:27.680] I just try to catch basically what's exceeding this value.
[09:33.680] And then in the end, I'm ending up with the loudness level of minus 10, of course, and
[09:38.800] everything that's above that peak-wise, it's getting catch by DCQ3 and newfangled elevate.
[09:46.560] So that's basically my mastering, I call it, it's not really mastering, but that's
[09:51.840] my process for the final master.
[09:54.640] And sometimes I dial in, like I said, you are oversampling an ultra 3 with the quality,
[10:01.120] but it all depends on how it sounds.
[10:02.840] So I try these settings out and listen to it, how it sounds, try it out on my smartphone,
[10:09.240] on different headphones, different speakers, and so on, and then settle to a certain setting,
[10:14.520] right?
[10:15.520] Okay, so this is the mastering process, but I want to show you also what you can do creatively
[10:22.360] or in a more like an creative phase where you want to use the DCQ for some sound designing.
[10:31.840] So here we have, for instance, the drum bus.
[10:35.600] And let's imagine you have a dirty drum loop, something, a classic drum loop or something
[10:39.600] like this, where there's a lot of noise in there and unwanted frequencies, so you can
[10:45.080] take the opposite approach, you put the DCQ3 on there, and then maybe disable the pre-EQ
[10:57.560] and then catch some frequencies, and you can see these frequencies that are getting
[11:06.480] catched here are probably the main important frequencies of this drum loop, so basically
[11:15.960] the meat of the snare and the kick, right?
[11:18.840] So you enable here this delta function, which brings out the removed frequencies, so exactly
[11:26.280] these frequencies here that are peaking, you get this spectral sound, then using here
[11:41.120] attack time, selectivity.
[11:55.560] So this is how it sounds now.
[12:06.120] So you can use this more like a filter to amplify or bring out all the important frequencies
[12:14.120] and leave all the unwanted frequencies out.
[12:17.560] So this is how I use it sometimes.
[12:20.040] Okay, I think that's it for this video, leave a like if you liked the video.
[12:25.040] If you have some questions, then please leave it in the comments.
[12:28.200] Thanks for watching and give this DCQ3 here a try, there's also a demo or trial version
[12:33.040] available on their website, link is in the description.
[12:37.320] Thanks for watching and bye.


