Soothe, DSEQ rebuilt in Bitwig
Tutorial | Nov 18, 2022
In this video I discussed how to mimic the behavior of the DSEQ3 with Bitwig Studio's native Loud Split device. I demonstrated how to set the Loud Split device to a 3 dB per octave tilt setting and how to adjust the loudness level, knee setting, and rise and fall settings. I showed how to identify resonances and over amplified frequencies in a mixdown and how to use the Loud Split device to reduce these frequencies. I also suggested using the Loud Split device for mastering.
You can watch the Video on Youtube - support me on Patreon
In this video, I explain how to emulate the DSEQ3's behavior using Bitwig Studio's native devices. The key points are:
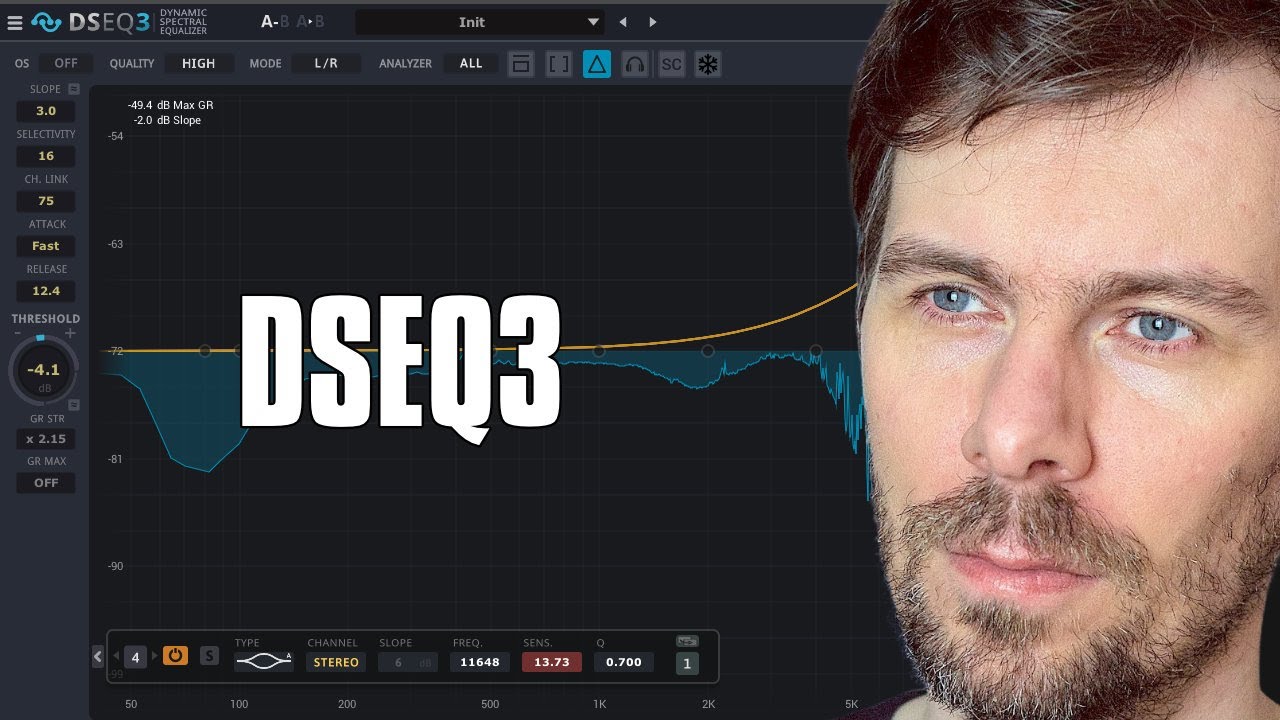
- DSEQ3 Analysis: Demonstrated using pink noise, I show how DSEQ3 works with a slope setting of 3.0 to balance frequencies in a mix.
- Using Bitwig's Loud Split Device: I illustrate how the Loud Split device in Bitwig can similarly handle frequency balancing. By adjusting the tilt setting and threshold, Loud Split can identify and manage frequencies that exceed the set threshold.
- Practical Application with a Drum Loop: I use a drum-based loop to show the practical application. The loop, unbalanced in frequency, is processed through Loud Split to manage hi-hats and snares, highlighting imbalances.
- Control Settings: The rise and fall (attack and release) settings in Loud Split are tweaked to manage how quickly it responds to threshold breaches.
- Comparison and Benefits: I compare this method to DSEQ3, emphasizing Bitwig's lower latency and the flexibility to add effects to the loud, mid, and quiet components separately.
- Potential Uses: Suggesting its utility in mastering and mixing, I encourage experimenting with Loud Split for creative and corrective purposes in Bitwig Studio.
This video serves as an informative guide on using Bitwig's native tools for frequency management, offering an alternative to the DSEQ3 with practical examples.
Transcription #
If you don't want to watch the Video, or search for a specific topic, here is the transcription of the video with links to video markers:
[00:00.000] Hey folks, welcome back to another video.
[00:03.280] Today it's about mimicking the behavior of the DSEQ3 with Bitwig native devices.
[00:09.840] So we have here a DSEQ3 and we also dialed in your slope of 3.0 at the top here.
[00:18.080] And you can see the pink noise test tone here, we have selected pink noise here which is
[00:22.160] equally powered per octave.
[00:24.960] And you can see the pink noise is peaking here equally across the threshold line.
[00:30.560] And the threshold line is of course with the slope of 3.0.
[00:34.880] So when we dial in 4.5 here, which is more easy on the low end, you can see the top end
[00:42.800] here is removed more and the low end is barely touched.
[00:49.520] So this is for me the proof that 3.0 here as a slope is exactly or matches exactly pink
[00:56.720] noise.
[00:57.720] And pink noise is nice for mixing down tracks or identifying peaking resonances or maybe
[01:04.720] over amplified frequencies in your mix down.
[01:10.680] And also here on the EQ+, you can see it's a straight line because we dialed in here
[01:16.480] a tilt setting of 3 dB per octave.
[01:18.920] So it also matches pink noise.
[01:21.160] And pink noise with this setting is on the EQ+, straight line.
[01:25.880] And you can also use this to mix down your track and look or identify frequencies that
[01:32.000] are over amplified in your mix down, of course.
[01:35.960] It's not like that I'm saying you need to make your track a straight line.
[01:39.640] It's not what I'm saying you can have dips in there.
[01:43.080] But maybe the bass, which is peaking here around here, right, and the hi hats should
[01:49.880] match on an equally line, something like this.
[01:52.760] So you know, then you have an equally balanced mix down.
[01:57.960] And also go down here in volume, you can see it on the on the line here, it's pretty straight,
[02:05.440] right?
[02:06.440] Okay.
[02:07.440] So with this EQ3 here, it tries to catch us all the resonances that go above this threshold
[02:14.440] line.
[02:15.440] And you can see this here in the display.
[02:17.440] And we also have a tech setting and the release setting where we can ease out the reaction
[02:23.680] time.
[02:24.680] You can see it's getting slower, reacting slower to the peaking frequencies.
[02:31.280] And yeah, just go back.
[02:33.400] So we have kind of a compressor setting here, we have a threshold setting where you can
[02:37.400] decrease the threshold.
[02:40.760] And we have a slope setting.
[02:42.280] Okay.
[02:43.280] So inside of Bitwig Studio, we have now loud split.
[02:48.680] And the loud split device basically splits the signal into quiet, loud and everything
[02:55.560] in between parts.
[02:57.920] And it's kind of the same thing.
[03:00.800] We can select the device and bring in a tilt setting of 3 dB per octave.
[03:06.440] And you can now see here, it's equally distributed, right?
[03:10.240] It's almost a straight line.
[03:12.200] Maybe bring down your the knee setting and then bring down the threshold of the loud
[03:16.640] part here.
[03:17.640] You can see the red flashes here, these red lines of frequencies that are going above
[03:26.440] the threshold line.
[03:27.440] And it's also equally distributed.
[03:29.560] So we have the same amount of things going over the red line here on each kind of part
[03:38.880] of the spectrum.
[03:40.800] So it's equally distributed.
[03:42.280] If you go lower, then of course you catch more things, but it's, you know, it's not
[03:46.520] like that you have only red things here and here, it's everything is yellow, it's equally
[03:50.720] distributed.
[03:51.720] So that's important.
[03:53.840] So to remove these things, these red flashes, all you have to do now is to disable the loud
[04:00.600] part.
[04:01.680] So everything that flashes red now here is completely removed, completely gone, deleted.
[04:11.320] It's not pushed down like on the DSEQ3 where it acts like a compressor.
[04:18.560] It's completely removed from the spectrum.
[04:20.720] You can also hear this when you play here, maybe a drum loop or something like this.
[04:26.480] You can hear it that these frequencies are missing.
[04:29.320] So if you like the sound of this, you can use it this way, of course, it's no problem.
[04:34.840] But you also can switch this back on and maybe just dial down here the loud part and maybe
[04:40.520] make everything that crosses this line 20 dB quieter.
[04:45.480] So it's also kind of, you know, reducing resonances in a kind of a smart way.
[04:53.360] And we also can dial in the rise setting, which is attack and fall, which is release
[04:58.800] to ease out what happens when these frequencies cross the threshold, how fast this device
[05:05.000] reacts to that and how fast it reacts to when something goes below the threshold, right?
[05:13.360] So it's kind of the same thing that what you do in the DSEQ3 just here with the native
[05:20.200] device.
[05:21.200] And I want to show you this in the next example with the drum loop.
[05:24.920] So in this example here, we have like a drum based drum loop and it's not very well frequency
[05:32.360] balanced.
[05:34.360] We have a lot of hi hats here and the kick drum is a bit too quiet, right?
[05:40.520] But that's the point.
[05:41.520] I'm going to make a point here.
[05:43.520] So in the DSEQ3, you can now see here that the hi hats are peaking above the threshold
[05:49.760] of the 3 dB slope and the snares may be a bit too over amplified, right?
[05:56.600] Or it's resonating too much and it's actually not a problem, but you can identify here certain
[06:04.360] things, right?
[06:05.360] So at least when the kick or when the snare drum is peaking here, the kick drum also should
[06:10.560] peaked in the same way as the hi hats and the snare and the kick.
[06:15.040] So this more like looks like the kick drum is too quiet for me.
[06:22.640] So maybe bring down here the snare drum also.
[06:29.000] So now it tries here to remove only the hi hats, maybe ease out here the settings.
[06:43.640] So and when we disable here the DSEQ3, it sounds completely different, right?
[07:00.560] So the DSEQ is basically a cueing for us and removing these frequencies because they are
[07:05.840] not really balanced with pink noise.
[07:10.480] So this is how we do it basically more or less with the DSEQ3 and I want to disable
[07:16.600] this and want to show you this here with a loud split device.
[07:20.920] So here it's the same.
[07:30.360] Maybe disable or maybe solely adjust the loud part, bring the rise down, the fall part down.
[07:36.320] You can see when we bring this down, the hi hats are peaking at first and then it's
[07:47.800] followed by the kick and the snare.
[07:53.120] So we can bring this down here in loudness, everything that goes above this line.
[07:57.200] Maybe we put it more over so we don't touch the kick and the snare, something like this.
[08:03.760] And then you bring in the rest.
[08:17.040] And then you can play around with rise and fall.
[08:33.920] So it's a nice way of identifying problems in the mix down or on certain sounds and maybe
[08:41.000] pull them down.
[08:44.800] As you can see it's peaking way too much and with the loud split on, we bring this down
[08:56.520] and ease it out a bit.
[08:58.280] So maybe you have an old drum loop, a classic drum loop from back in the days, old funk
[09:02.920] drum loop with a lot of high end content.
[09:06.680] You can use the loud split here and bring down the loudness just of the bits that are
[09:12.840] going above the threshold line.
[09:15.720] And it's actually very useful and I think I'm trying this trick or this workflow out
[09:21.440] in my next songs, my next mix downs, instead of using DSEQ3 and see how it works out for
[09:29.320] me.
[09:30.320] Because actually a neat device and it's in Bitwig Studio already included, it doesn't
[09:36.920] have too much latency and yeah, I can put some devices or some stuff on loud and mid
[09:45.440] and quiet in these boxes here and maybe act on certain things.
[09:51.040] So we will see.
[09:53.760] But this is what I discovered lately and made some experiments with it and I think it's
[10:00.400] a nice way of using this device instead of, you know, making some creative things.
[10:06.480] You can also use this for mastering.
[10:08.480] So this is what I want to show you in this video basically.
[10:12.240] If you have some more discoveries with this, let me know.
[10:15.560] I think for now that's it.
[10:17.920] Thanks for watching.
[10:18.920] Leave a like if you like the video, thumbs up or leave a comment if you have some questions
[10:23.680] and thanks for watching.
[10:24.680] See you in the next one.
[10:25.680] Bye.