Reloop Keypad Pro- Affordable Bitwig Controller
Tutorial | Jul 04, 2025
The reviewer tested the affordable Reloop Keypad Pro DAW controller, highlighting its solid build, useful Bitwig integration, velocity-sensitive keys, versatile controls, and convenient features like battery power, a mini USB hub, and scale modes. It worked flawlessly with Bitwig on Windows and offered flexible mapping and performance options, although switching between modes for clip launching and drumming could be more streamlined. Overall, the Keypad Pro is recommended as a fun, budget-friendly controller for Bitwig users, especially in club settings or for mobile music-making.
You can watch the Video on Youtube
- support me on Patreon
- buy the Keypad Pro on Thomann
- read more about the reloop Keypad Pro
Short Overview #
Last week, Reloop reached out to me about reviewing the Keypad Pro. Even though I am not a hardware review channel, I was curious because of its Bitwig integration. The Keypad Pro is an affordable controller, but it does not feel flimsy or fragile. It seems just right for use in a club, where gear can take a beating. The keys are velocity sensitive and a bit small, which actually works well for tight spaces like my Linux desk. The controller is packed with features, including finger drumming pads, sliders, knobs, DAW controls, modulation and pitch bend options, MIDI out, a USB hub, and the option to power it by battery if you want to use it away from USB sources or with analog synths.
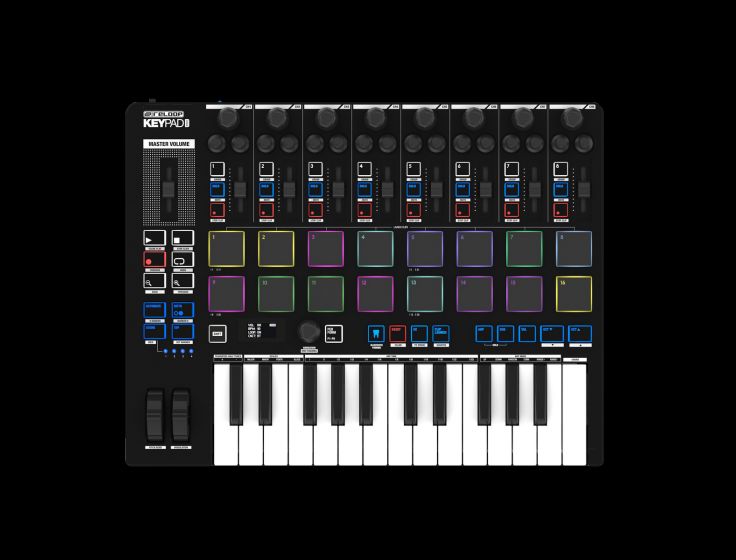
Integration with Bitwig is straightforward. Bitwig usually recognizes the device automatically, but you can also add it manually. Controls like the master fader and track faders work right away. The keyboard is velocity sensitive by default, but you can switch that off if you prefer all notes at maximum velocity, which is great for drums. The device also features an arpeggiator and a scale mode, letting you quickly set it to play in major, minor, pentatonic, or blues scales. There are octave switches, and the pads can work as either MIDI triggers or a clip launcher, which is especially handy when recording in Bitwig.
You can easily remap controller knobs to control other parameters in Bitwig beyond the default panning and sends. Switching between modes for finger drumming and clip launching can be a bit fast-paced, and it might be easier with a foot controller to start and stop recording, but these are issues I have with most controllers, not just this one. Overall, the Keypad Pro offers a lot of flexibility and integration for its price. It is a great portable and affordable option, especially for Bitwig users, and while I am not a hardware reviewer by trade, I found it easy to set up and fun to use. I will be testing it with my Linux setup soon and can share how that goes next time.
- The Reloop Keypad Pro is a budget-friendly DAW controller with good build quality and solid Bitwig integration.
- Features include velocity-sensitive keys, finger drumming pads, sliders, knobs, pitch and modulation controls, MIDI out, foot controller input, battery or USB power, and a USB hub.
- The device is suitable for both club and desktop use, being affordable enough for riskier environments but sturdy enough for regular performance.
- Bitwig integration allows plug-and-play functionality, automatic controller recognition, and specific controls such as master and track faders.
- Includes performance features like an arpeggiator, scale selection (major, minor, pentatonic, blues), octave switches, and velocity on/off toggle.
- Clip launcher and pad integration enable easy recording, quantization, and performance of clips and drum patterns, with additional quantize and scale mapping features on the controller.
- Custom mapping of controls is possible for personalized workflow, such as remapping pan or send knobs to pitch or filter adjustments.
- Some workflow challenges exist, especially when quickly switching between clip launching and finger drumming, but workarounds like the foot controller are suggested.
- The controller works well on Windows, with planned testing on Linux for future updates.
- Overall, the Keypad Pro is recommended for Bitwig users seeking a compact, feature-rich, and affordable controller.
Introduction: Why Review the Reloop Keypad Pro? #
Last week, Reloop reached out and asked if I would be interested in reviewing their Keypad Pro controller. Initially, I hesitated. Hardware reviews are not my usual content; I do not run a channel like Loupop with multi-camera setups for product close-ups. However, since my channel focuses on Bitwig and this device is specifically integrated with Bitwig, I thought it would be worthwhile to give it a try and share my experience.
First Impressions and Build Quality #
Reloop sent over the Keypad Pro, which presents itself as an affordable, dedicated DAW controller. The pricing is accessible, positioning it as neither cheap and fragile nor prohibitively expensive. This makes it ideal for gigging environments such as clubs, where devices might face rough treatment from spills, dust, or the energetic antics of crowds. While budget-friendly, it does not feel flimsy or like it will break apart with standard use.
Features and Hardware Layout #
The controller provides several important elements:
- Velocity-sensitive keys that, while small, are practical for compact setups like my Linux workstation.
- Drumpads for finger drumming alongside various sliders and knobs.
- Dedicated DAW controls, modulation and pitch bend wheels on the side.
- Connectivity options including a foot controller input, MIDI output for external gear, USB input, and even a small USB hub for attaching extra devices.
- Options for both USB power and battery operation, with a switch to select between power sources.
This well-considered feature set makes the Keypad Pro versatile enough for studio and live contexts.
Price and Market Position #
Currently sold for around 209 euros in Europe, the Keypad Pro is attractively priced. I have not checked current US pricing, but it is likely to be similarly positioned as a mid-range device that delivers value without aiming for premium territory.
Bitwig Integration and Setup #
Setting up the Keypad Pro in Bitwig is straightforward. Connect via USB, power on, and Bitwig should auto-recognize the controller. If it does not appear, you can manually add it by navigating to the controller preferences and selecting Reloop Keypad Pro from the list. If any issues arise with MIDI not functioning, turning the device off and on again is a reliable troubleshooting step, at least on Windows.
Testing Basic Controls #
Testing the faders and keys confirmed that all the basics work as expected. The keys are velocity-sensitive, which can be toggled on or off using a dedicated button, useful for switching quickly between expressive playing and fixed velocities for drums. There is a handy reset feature that restores the controller to its default state, functioning as a "panic button" if anything gets stuck or confusing.
Built-in Arpeggiator and Scale Modes #
The Keypad Pro includes an arpeggiator, which automatically sequences held notes. There is also a hold function, allowing you to continue playing sequences hands-free after releasing the keys. Arpeggiator speed and note divisions can be easily altered on the device.
For creative flexibility, scale modes are available, enabling the keyboard or pads to lock into major, minor, pentatonic, or blues scales. This means any notes played are automatically transposed into the chosen scale, making composition and improvisation more accessible, especially for non-keyboardists.
Octave Switching and Pad Modes #
Octave up and down buttons are essential for getting more range out of the small keyboard. The pads can be switched between modes, functioning either as note inputs or as a clip launcher within Bitwig. When using the pads as a clip launcher, you can record, play, and stop clips directly from the controller.
Real-World Workflow and Quantization #
Recording and quantizing MIDI performances works both in Bitwig and directly from the controller, allowing real-time correction of timing errors. You can switch between preset quantization settings or apply quantization after recording with simple shortcuts.
The controller’s default mappings for knobs and sliders are panning and send levels, but you can reassign these to parameters such as filter cutoff or wavetable position. This quick remapping capability increases creative efficiency, letting you tailor the controller to your workflow needs.
Drum Programming and Clip Management #
While the pads are great for finger drumming, switching between clip launcher and performance modes during recording can be a bit awkward and requires some muscle memory training. Using a footswitch for start and stop operations is a recommended workaround if hands-free control is needed. This limitation is not unique to this device but is common among most controllers with similar functionality.
Flexibility and Practical Use-Cases #
For portable setups, such as using a laptop on a train where space is limited, the Keypad Pro allows complete music creation and arrangement without needing a mouse. Practicing and adapting to its workflow can help you achieve a great creative flow on the go.
Bitwig and Linux Compatibility #
I intend to try this controller on Linux Mint over the weekend to confirm its compatibility, but on Windows it performs flawlessly. The Bitwig integration includes special features for the pads, such as custom scale mapping per pad, which extends the musical possibilities.
Final Thoughts #
Overall, for roughly 200 euros, the Keypad Pro offers substantial value for Bitwig users wanting a compact, flexible, and full-featured controller. I appreciate being able to present this review, even though hardware content is not my usual focus. If you have feedback or questions about the device, please let me know. This is a fun, accessible product that I recommend considering if you are interested in DAW controllers with seamless Bitwig integration.
Full Video Transcription #
This is what im talking about in this video. The text is transcribed by Whisper, so it might not be perfect. If you find any mistakes, please let me know.
You can also click on the timestamps to jump to the right part of the video, which should be helpful.
Click to expand Transcription
[00:00:00] Hey folks, welcome back to another video. So ReLoop asked me last week if I want to review
[00:00:05] the Keypad Pro and I said, well, I'm actually not a hardware review channel. I'm not Loupop.
[00:00:11] I don't have 50 cameras to film this thing like an ad. And I said, well, you're actually
[00:00:16] a Bitwig channel and this one has a nice Bitwig integration. I said, that's great. Please send
[00:00:20] it over. And guess what? That's exactly what they did. They send it over. So this is how
[00:00:27] it looks like. And that's basically the story for the intro. So this is the Keypad Pro dog
[00:00:34] controller. It's a cheap one. So it's not expensive. But it's not the bad thing, you know, in the club,
[00:00:40] everything can happen in the club, right? Beer flowing around, smoke, dust, moist, people are
[00:00:47] exploding into emotions or whatever happens there sometimes. So what I want to say is these
[00:00:54] controllers can get hurt and you don't want to have a controller in the club that is two bucks or
[00:00:59] two K bucks or whatever expensive these controllers are. So yeah, that's not a bad thing. And it's
[00:01:06] also not so cheap that it feels like it's, you know, breaking apart from itself. It's, it works.
[00:01:13] So everything is on there that that you want in such a controller. So we have keys here. These
[00:01:21] are by the way, velocity sensitive, which is nice. They're also very small, which is okay for me if
[00:01:29] I want to use it on a small desk like my Linux desk there. There are some controls here, some
[00:01:36] finger drumming pads, we have some sliders, knobs, dog controls, modulation, pitch band on the right
[00:01:46] side here. There is a foot controller you can attach and also here a MIDI out if you want to
[00:01:51] connect some synthesizers. And on the back here, there's a main USB input and also here a small
[00:01:58] little USB hub. So you can attach additional devices. We have an on switch of battery powered or USB
[00:02:05] powered battery powered. Yeah, can attach you some batteries down here. So you can use this without
[00:02:12] USB if you just want to power or if you want to control some analog synthesizers without USB, you
[00:02:18] can do this. So yeah, that's basically the controller from the outside. And I also just
[00:02:26] noticed this camera, it looks like it films my crutch, which is not the case. It just is on the
[00:02:33] device itself just to make this clear. So on Tomah here, you can see it's currently 209 bucks in
[00:02:42] Europe. I don't know how expensive this is in America, probably $2 million or whatever. The
[00:02:50] current tariff is there. I have no idea. So it's currently on sale. And down here, there was some
[00:03:00] kind of review by Swedish guy and he likes it. I have no idea who this guy is, but he likes it,
[00:03:06] okay. And he also likes the Bitwig integration here, which is exactly what we want to test today.
[00:03:14] I also can see I have also an affiliate link. Maybe I put this in the description. I never used
[00:03:20] actually this because I don't do hardware reviews. I put this in the description. Maybe this makes
[00:03:24] me rich. I have no idea. So in Bitwig, what we need to do our first I want to show you also here
[00:03:33] the device itself. What we want to do in Bitwig is of course go to the controllers page here. And
[00:03:39] we want to connect here this first with USB cable, which is not prepared at all. Okay. And then
[00:03:50] switch this on. Okay, light show. Nice. It shows me here already the keypad pro and input and output
[00:03:58] is already connected. If this is not showing up for you, you have to add the controller here
[00:04:04] manually down there, go to Reloop and then select your keypad pro and then you can add it, right.
[00:04:11] But usually it's just recognized by Bitwig itself usually. And sometimes if something doesn't work
[00:04:20] in Bitwig with the MIDI controls, make sure you just switch it off and you switch it on again.
[00:04:25] It's not a joke. It's not the IT crowd choke. It's it's it works. Trust me, at least on Windows.
[00:04:32] It really works. Okay, so let's try out your master fader. Nice. This works. First track fader also
[00:04:43] works. And we probably don't need an audio channel here and only need this one. Okay. So this looks
[00:04:52] like it works. And we want to also actually here just make sure it's sharp enough. Okay. Let's add
[00:05:05] here some kind of synthesizer polymer. Would be nice to have this kind of controller with the
[00:05:14] keyboard here. I mean, with a real keyboard included in this. So we have everything in just one
[00:05:19] one device. Okay, so we can arm this track here. So we can play it. And like I said, this is velocity
[00:05:32] sensitive. Can amplify this by using the slider. And you saw unison and use the velocity here for
[00:05:47] the modulation amount. Maybe make this longer. Nice. If you don't like the velocity sensitivity on
[00:06:03] this keyboard here, you can just switch this off with this button here velocity. When this is off,
[00:06:10] all the key presses here are basically maximum velocity, which is probably nice for drums or
[00:06:17] something like by default. This is on. Also, you can see any time I change something here with the
[00:06:26] settings like this, you can see the reset button here is enabled, which means I can press this
[00:06:33] reset button. And it brings the state of this device into its default state. So it's basically a
[00:06:41] polarity panic button. So I have no idea what's happening. Just press reset and you're back to
[00:06:45] your default state. It's just really nice to have. We also have here some kind of additional features
[00:06:56] like an arpeggiator we can activate. So it can hold down multiple notes here. Then it just plays
[00:07:06] some kind of sequence. And then we have here some kind of hold features we can release our keys,
[00:07:16] and it just keeps playing. So there's a hold feature here. If I switch this off, it just stops,
[00:07:22] which is also sometimes nice for drones. But when you press multiple keys, it gets very hard
[00:07:31] to press this. Maybe another try. Maybe change the speech into 16 notes. So it kind of works. Reset
[00:07:59] and reset. Nice. Okay, so that's the ARP. So we can change here also the ARP speed with the
[00:08:07] keyboard. You have here some additional features on top. We have also scales. So we can choose
[00:08:13] between major, minor, pentatonic, and blues. We hold down shift, shift, and then we press here
[00:08:21] major or let's say minor. You can also see the C on display. And then what we play here is basically
[00:08:29] the major scale, C major. This is major. I actually use minor here. This is the C minor scale. So you
[00:08:42] can see I'm pressing here a C sharp, but it's still playing C. If I switch this off, it's C sharp,
[00:08:51] but with scaling here, it's transposing basically automatically all the notes into the right
[00:08:58] position for the scale. So this is also included if you want to use this. So ARP scale, scalar feature,
[00:09:08] also velocity, and we have here some octave switches, which I use all the time with these
[00:09:15] kind of small keyboards. So maybe add here another track. Let's use here my lush kind of pad sound.
[00:09:29] So at the moment here, the pads are in this kind of MIDI trigger mode. We can just play this like we
[00:09:54] play the keyboard down here. So these pads are basically just representing the notes. But we can
[00:10:05] also just say we want to use these pads as a clip launcher. So now you can see we can record here.
[00:10:12] These two are red because this is armed. When you arm here basically the first track, you can record
[00:10:19] this channel or we want to record here just the pads. We had to record, but I also want to enable
[00:10:28] here the metronome. So let's record this. Just playing some notes from the scale octave up,
[00:10:47] octave down, maybe a bass, octave up. And then we want to stop the recording and it just keeps
[00:11:11] playing what we just recorded. Can I actually switch back here to the beginning? Probably not.
[00:11:19] So with this we can easily record things here. And inside of this note clip you can see all the
[00:11:36] notes are all over the place. But we have here the record quantization on inside of Bitwig. But
[00:11:44] if you don't use this, let's switch it off here for a moment and record something different. Let's
[00:11:49] record here the first track. Let's record this with metronome of course.
[00:11:59] And here it's all over the place.
[00:12:21] But we can just quantize this by using here, let's say shift and then quantize. You can see
[00:12:34] it's on the screen all the notes then in the right place. But if you don't want to use this
[00:12:41] feature you can obviously just always here use record quantization in Bitwig and say always
[00:12:47] quantize to 8 notes or 16 notes or whatever. I use this all the time because it's you know,
[00:12:54] it's just helpful. But you can also do it on the controller itself here with the quantize option.
[00:13:01] Maybe use a different wavetable here, the basic. We need just some kind of reverb. Let's use the super
[00:13:24] massive. So what I also found out here with this controller is usually you can see here
[00:13:51] on the track itself when I use here these top buttons. This is usually a panning and
[00:13:57] this is sent one and sent two. And I don't use send and panning all the time. And it's
[00:14:04] also not something I want to access on a controller all the time. I just dial it in once. And that's
[00:14:12] basically it. So yeah, I can change basically the panning. But what I do sometimes is I
[00:14:20] just hear say map controller or key and then I just use this. And now we can see I'm now
[00:14:30] moving here this cutoff frequency. And this is detached. So it's not changing the panning
[00:14:40] anymore. So we can replace or remap this very quickly. You just use here the mapping and
[00:14:47] map it to something else and then the old functionality is basically removed. And now
[00:14:52] we can change here this. Or maybe I want to use this for the index. Maybe let's this on.
[00:15:17] So by default, this is basically panning and send once and two. But if you map it, then
[00:15:21] you can map it to something else, which is pretty cool. I also found that using the clip
[00:15:29] launcher here is cool. But let's say you want to make some drums with this, right? You have
[00:15:37] to use this kind of finger drumming mode here. But you also want to record or change the
[00:15:44] clip launcher, right? So we press record here. Then you switch quickly back to this mode,
[00:15:50] turn your stuff and then you have to stop, switch back and you have to hit the stop button.
[00:15:57] So you have to be pretty fast to switch between the modes and then hit the right clip button
[00:16:03] or clip note clip in here, right? So this is a bit, yeah, not so easy to do in my opinion.
[00:16:12] But for this, maybe you can use the foot controller. So you have a can use your foot basically
[00:16:17] to start and stop the recording. That's probably better. So that's not a problem of the device
[00:16:24] itself. It's something I, it's a problem I have with most controllers. Maybe they can
[00:16:31] add here a button for stopping the clip recording outside of this, right? So you can say clip
[00:16:39] launcher, record, back, drum your stuff and then you hit a different button here to just
[00:16:44] stop the recording. It's not very easy. Maybe I can try this out here. Drum machine, maybe
[00:16:58] I can see a house kid, brakes kid, I have no idea what kind of kid I want here. E drums
[00:17:06] kid. Let's try this one. So right, I want to record this. Let's hit okay. I want to record
[00:17:25] this. So what I have to do is now I have to switch to clip launcher, right? The clip is
[00:17:33] already recording. So I can't basically record in place, which is small problem for me always
[00:17:42] with all kinds of controllers. We can delete this here. So maybe I have to hit stop here.
[00:17:51] This on clip launcher on this. Then I have some preparation time, right? Now we have
[00:18:11] to switch back and I have this and then it doesn't work. But it's not the problem of
[00:18:17] this controller. It's the problem I always have a different controllers. It's the same
[00:18:20] thing. And now we basically have to go back into the clip and you have to change the sizing.
[00:18:25] So it matches basically what you did there length go to four.
[00:18:54] Yeah, it's kind of fun to play around with this, to be honest. Let's hit stop here. But
[00:19:07] you have to kind of practice this because I'm so in my flow with the keyboard and with
[00:19:14] the mouse. Like I said, I'm really not a hardware guy. So you have to really focus on this device
[00:19:20] and remap your muscle memory. So you don't use the keyboard and you use this. But like
[00:19:26] I said, if you use this maybe in a train where you don't have the place for the mouse and
[00:19:31] you have a laptop and you just want to quickly record this, you can really find the flow
[00:19:36] with this device. And like I said, it's also not very expensive. So I want to try this
[00:19:43] out over the weekend on my Linux PC. I'm using Mint there. And maybe it can give you an update
[00:19:49] on this how it works on the Linux. But for Windows, it kind of works flawlessly, in my
[00:19:55] opinion. There are also some features here for the pads, you can switch this into some
[00:19:59] kind of different mode here. I haven't explored actually any everything just showed you the
[00:20:07] basics. There are some more features to this with the Bitwig integration. There's like
[00:20:13] I said, here some kind of scale feature for this for these pads. So you can say I want
[00:20:18] to play all the chromatic keys on here, but here give me give me maybe D sharp minor.
[00:20:25] Then this is the root note. This is the second, the third and so on. So scale mode just for
[00:20:29] the pads. This also kind of works. And it's it's a nice package, in my opinion, for 200
[00:20:38] bucks is nothing, you know, you could be mad about. I want to show you this because I think
[00:20:46] it's a, you know, I'm a Bitwig channel. Like I said, I'm not getting paid for this to do
[00:20:51] this video video. I have to send this back to to reloop next week probably. But it's
[00:21:02] a fun one, fun controller. So I want to give you a nice review, a nice overview over this.
[00:21:08] Maybe give me feedback if how did it, what, you know, are you informed? Do we like the
[00:21:16] device? I don't know. Let me know. Okay. So this is the keypad pro. Thanks for watching
[00:21:21] the video. Like the video, maybe buy one of these devices. I have no idea. That's it.
[00:21:29] Bye.
[00:21:29] Bye.
[00:21:30] [BLANK_AUDIO]