Poly Grid - Granular Synthesis
Alright, let's dive into another interesting kind of synthesis: granular synthesis. That might sound super complicated at first, but actually, it's pretty straightforward.
Here's the deal: with granular synthesis, you usually start with a sample. And if you don’t have a sample handy, like when you're working with granular audio effects, then you just use an audio buffer. That basically means the audio signal gets recorded into memory (a buffer) and then played back in a modified way. So essentially, the basis of granular synthesis is almost always either a sample or a buffer (which are basically the same thing).
How to Work with Samples in the Grid #
Now, in Bitwig, if we want to work with a buffer, we need a device that can record and play back audio signals. At this point in our tutorial, our options are pretty limited, we've mainly got the Sampler and the Recorder and the Array module in Bitwig Grid.
For now, let's stick with the Sampler since it's available right inside the Grid and it gives us everything we need for classic granular synthesis.
Using the Sampler in the Grid is easy:
- just drag and drop your audio file directly into into the Grid onto the empty space from the Browser,
- or drag the the Sampler Module from the Module Palette into the Grid and then drag the sample into the Sampler
- or you can drag an audio clip straight from the arranger into the Grid, and Bitwig will automatically create a Sampler for you.
Now, of course, we're not here just to play back a boring old sample. We want to use granular synthesis!
Granular Synthesis with the Sampler #
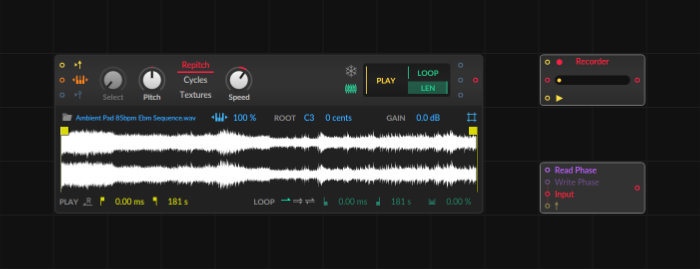
With the Sampler, we can simply use the Textures Mode of the module to set up granular synthesis. This mode allows us to define a small looped section of the sample with the Grain Knob, and the playback speed with the Speed Knob.
But in our Tutorial, we want to switch the Sampler into Freeze Mode. Here, we can define the position inside of the sample so we can jump around in the sample as we like (the Speed Knob is replaced by the Position Knob when Freeze Mode is active).
Nice! With this setup, we've basically got everything we need. And you know what? We don't even need to build complex module chains in the Grid because the Sampler module already gives us all the tools we could want.
Here's the quick breakdown of what we can do right out of the box with the Sampler module:
- Position: You can modulate the position knob to move through different parts of your sample.
- Grain Size: Use the Grain knob modulation to make your looped section longer or shorter.
- Pitch (Playback Speed): Adjusting pitch speeds up or slows down the grain playback, which naturally changes the note or pitch you're hearing.
- Triggering (Yellow Gate Input): Trigger the sampler from outside with a gate signal.
- Pitch Input (Orange Pitch Input): Adjust the pitch from external modules.
- Audio Output (Red Audio Out): Obviously, get your audio out into the world!
So yeah, everything you really need for granular synthesis is already right there in the Sampler. Just drag in a sample, set the module into the right mode, and modulate the right knobs. Then, boom... you're good to go!
And honestly, this is what I meant earlier about things starting to repeat themselves. We've covered the essentials of Bitwig's Grid. From now on, it's all about combining modules in creative, elegant, and interesting ways. You can dream up a cool logic setup to trigger and modulate your sample exactly how you want, creating unique and personal sounds. There's no strict rule—feel free to experiment and play around.
Example Setup with the Sampler #
To show you what I mean, we could sketch up an very basic example:
In this example setup, we've got:
- A Constant module, which gives us an endless gate trigger because it always outputs a value of 1. Basically, it’s like keeping your finger constantly pressed down on a key.
- A Pitch module (similar to the Constant), that gives us a steady, fixed pitch, set in this case to C3.
- Two random generators, which provide us random values for both the position within our sample and the grain motion.
Notice how I disabled the pitch and gate pre-cords: this prevents the sampler from reacting to MIDI keyboard inputs or notes coming from the piano roll. If you leave this enabled, it's totally fine, but you might mix the two inputs (sum them together) and end up with incorrect pitches or gates.
If you don't know what I mean, go back to the previous lesson and check out the section on pre-cords.
By the way, these random generators are called S/H LFOs (Sample & Hold LFOs). They're technically LFOs, but instead of smooth waveforms (like a sine), they pull random values from a white noise source and hold those values steady for a certain amount of time before jumping to the next one. Pretty handy for getting some unpredictable and cool variations in your granular sounds.
But remember, that's just one way to do it... there are countless creative possibilities, so let your imagination go wild!
Array & Recorder Modules #
Now, there were two other modules I briefly mentioned but didn’t fully discuss: the Recorder and the Array.
Recorder Module
- Big plus: It can record live audio signals on the fly, capturing sound into its buffer.
- Big minus: It’s pretty limited. It can only playback linearly, meaning no changing playback speed, no looping, and no picking specific positions within the buffer. Plus, it only holds up to six seconds of audio. For granular stuff, this is kind of a buzzkill.
Array Module
- Big plus: You can jump around in the buffer, and you can alter playback speed.
- Big minus: It has a tiny capacity, only 1024 sample points and tends to sound pretty lo-fi, crunchy, and bit-crushed. That retro sound might occasionally be cool, but it's not the best fit for most granular experiments.
Right now, the Sampler module is definitely your best buddy in Bitwig’s Grid if you're serious about granular synthesis. The other options just come with too many limitations for most workflows, so I won't dive deeper into those for now.
So, keep experimenting with the Sampler, and you'll see how far you can go! Let me know if there's anything else you're curious about.
Some Examples: Granular Audio Effects #
Here is a video that shows how I used the Recorder to create "Grainspacer," a granular audio effect. It's not overly complicated.
Here, I'm using just delays, essentially audio buffers—to create a granular effect.
▶ Next Lesson: Poly Grid: Physical Modeling
◀ Previous Lesson: Poly Grid: Vector Synthesis
▲ Bitwig Grid Course Overview