Poly Grid - Physical Modeling
Alright, let's talk about physical modeling. This sounds like a big topic, because it is a different way of thinking about synthesis.
With subtractive, additive, FM, or wavetable synthesis, you often think directly about the sound: oscillators, overtones, filters, envelopes, modulation and so on. With physical modeling, you try to think more about the physical properties of an instrument. What starts the vibration? What resonates? What damps the sound? What body or room gives the sound its character?
So instead of saying "I need a bright pluck", you can think more like this:
- A string is excited by a pick, hammer, finger, or bow.
- The string vibrates at a certain pitch.
- The vibration loses energy over time.
- The body of the instrument adds fixed resonances and color.
That is the basic mental shift. You are not only creating a waveform. You are building a small model of a physical process.
For this lesson we keep it very small and practical. A lot of physical modeling patches can be reduced to three parts:
- An exciter - something that starts the sound, like a pick, a hammer, a bow, breath, or a short burst of noise.
- A resonator - something that rings after it gets excited, like a string, a tube, a metal plate, or the body of an instrument.
- A body - something that colors the result with fixed resonances, like the wooden case of a piano, the body of a guitar, or even the room around the instrument.
Inside the Grid we can build the simplest useful version with a Noise module, a very short AD envelope, and a Comb filter. The noise burst is the exciter. The comb filter is the resonator. The body can be added later with filters or EQ.
This is not about perfectly recreating a real guitar, flute, or violin. It is more about using the same basic idea: a short impulse goes into something that rings.
This specific technique is also known as Karplus-Strong string synthesis. It is one of the simplest physical modeling ideas: a short burst of sound is sent into a very short delay with feedback, and the delay behaves like a vibrating string.
The Basic Patch #
Let's build a small plucked resonator.
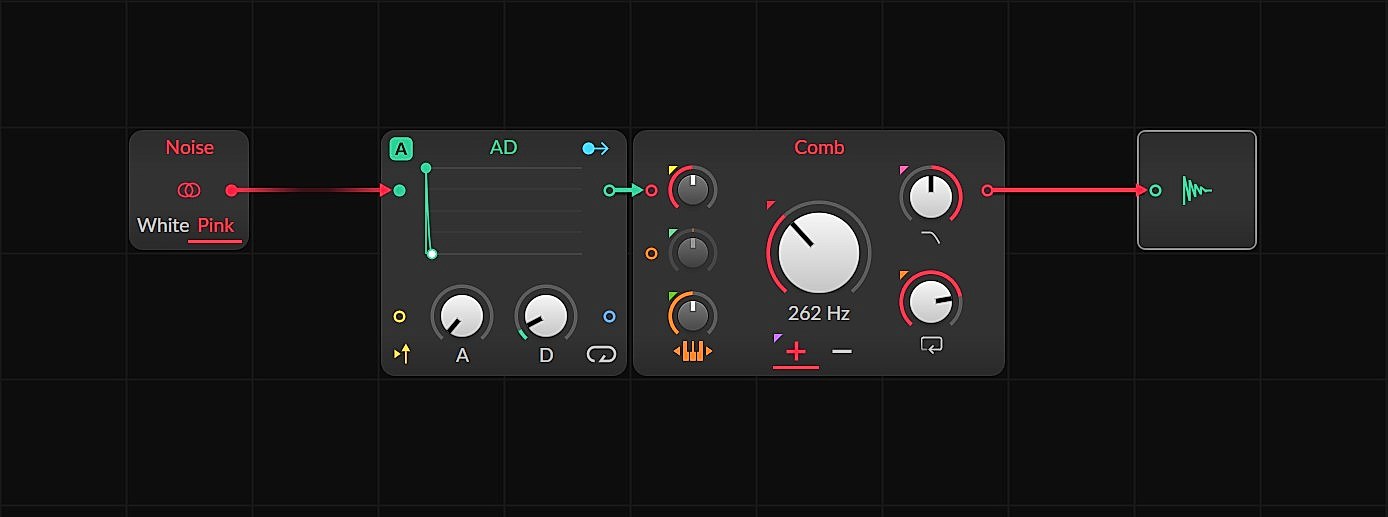
- Start with a new Poly Grid.
- Add a Noise module.
- Switch the Noise module to Pink noise.
- Enable stereo noise, so the left and right channels use different noise seeds.
- Send the Noise audio output into an AD envelope.
- Keep the Gate pre-cord of the AD envelope active, so every played note retriggers the envelope.
- Set attack and decay very short. We only want a short noise burst, not constant noise.
- Send the audio output of the AD envelope into a Comb filter.
- Keep the Pitch pre-cord of the Comb active, so incoming notes tune the comb frequency.
- Set the Comb feedback fairly high, so the resonator rings like a vibrating string.
- Use the positive polarity feedback mode. In the module this is the small + button.
- Send the Comb output into Audio Out.
Now you have this structure:
Pink Noise -> AD Envelope -> Comb -> Audio Out
              ^
              Gate pre-cord

Note pitch ----------------> Comb pitch pre-cord
The important part is the envelope. Noise by itself is just a constant noisy signal. The AD envelope cuts it down into a small burst, almost like a tiny click, scrape, or pick movement. That burst excites the comb filter, and the comb filter rings at the incoming note pitch.
The Audio Out module usually has Hard Clip enabled. This keeps the signal below 0 dB, or clips and saturates it if you push the patch too hard. That can be useful, but while building the patch you should still keep the level low.
Why the Comb Filter Works #
A comb filter is basically a very short delay with feedback. Because the delay time is so short, you do not hear it as a normal echo. You hear it as a pitch.
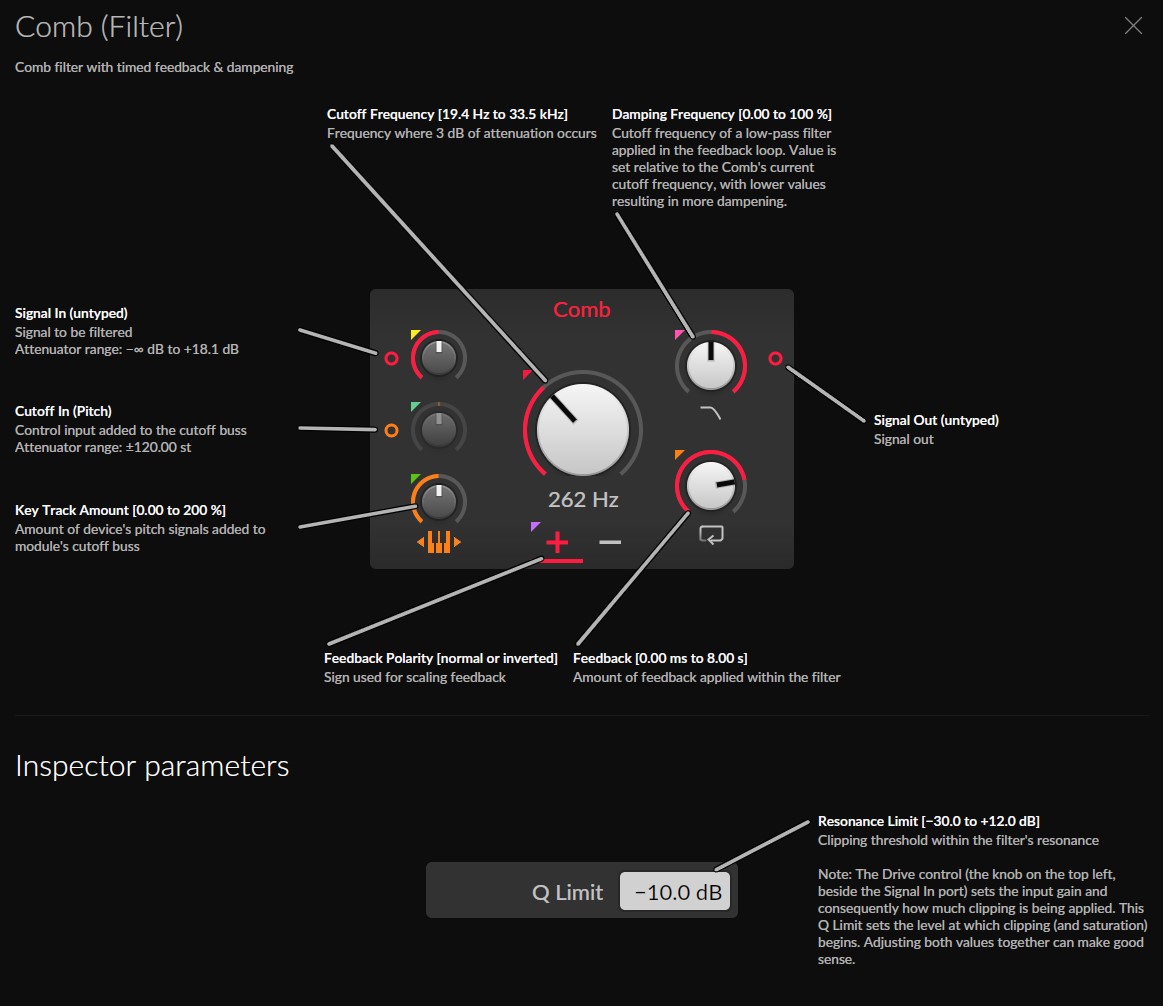
In this patch, the comb filter is doing the physical modeling part. It stores the noise burst for a tiny moment, feeds it back into itself, and creates a decaying vibration.
The default frequency is 262 Hz, which is roughly C3 in Bitwig. If the Pitch pre-cord is active, the comb filter uses the pitch signal from your notes and maps the delay time to the played pitch. This makes the filter playable, almost like a string.
So the basic controls work like this:
- Comb pitch / frequency controls the note that rings.
- Feedback / resonance controls how long it rings.
- Positive feedback polarity gives the basic Karplus-Strong string behavior used here.
- Damping Frequency works like a low-pass filter in the feedback path and removes overtones from the string vibration.
- AD envelope decay controls how much noise enters the resonator at the start.
If the Pitch pre-cord is off, the comb filter stays at its own frequency. That can be useful for fixed percussion or resonant objects, but for this patch we keep it active so the sound follows the keyboard or piano roll.
Shape the String #
The string behavior comes mostly from the comb filter.
Try these changes:
- Raise feedback for a longer ringing string.
- Lower feedback for a shorter, more muted pluck.
- Lower the Damping Frequency for a softer, darker string.
- Raise the Damping Frequency for more bright overtones.
- Switch polarity or feedback settings if you want a different resonant character.
Small changes matter here. If the feedback is too low, you mostly hear the noise burst. If the feedback is too high, the patch can ring for a long time or become very loud.
Shape the Exciter #
The noise burst decides how the resonator starts moving. In the screenshot, the Noise module is set to Pink and stereo, so the input has a slightly softer spectrum than white noise and a wider stereo start.
Try these settings on the AD envelope:
- Very short decay: more clicky, plucky, and percussive.
- Longer decay: more breath, scrape, or bow-like noise.
- More attack: softer start, less click.
- Less attack: sharper pick or hammer.
You can also filter the noise before it enters the AD envelope or before it enters the Comb:
- Low-pass before the comb: softer material.
- High-pass before the comb: thinner, sharper attack.
- Band-pass before the comb: more focused excitation.
The thinking here is that the input noise decides which frequencies build up first and how they behave while the string is ringing. The better you shape the noise before it enters the comb filter, the more different the sound gets. Remember that there is feedback involved, so frequencies build up over time. If one frequency is louder than the others, it builds up faster, and that gives the sound its overtones. So keep experimenting with low-pass, high-pass, or band-pass filtering before the comb. If you use an external noise source, you can even draw EQ curves for that.
This is a nice thing about physical modeling patches. The resonator is important, but the input signal is just as important. A string hit with a soft finger does not sound like a string hit with metal. In the Grid, this difference can be as simple as changing the envelope or filtering the noise before it hits the comb.
Add a Body #
Right now the comb filter gives us the vibrating string, but real instruments also have a body. A piano is not only strings. It also has a soundboard and a wooden case. A guitar is not only strings. It also has a resonant body. Even a room adds static frequency properties to the sound.
The important thing is that the body does not follow the played pitch. It often adds more fixed resonances. These are like formants or static frequency areas that come back again and again, no matter which note is played.
For a simple body model, add a few filters after the comb:
- Add two or three Band-Pass filters in parallel.
- Tune them to fixed frequencies, for example low-mid, mid, and high-mid areas.
- Mix them back together with the dry comb signal.
- Keep the resonance moderate.
In the Grid this means you turn off the pitch pre-cords on the body filters, so a played note does not automatically change the filter frequency. The body stays put while the string follows the keyboard.
This creates static formants. They act a bit like the wooden body of an instrument, a small box, a pipe, or a resonant metal object. The comb gives you the playable string. The body filters give the patch its character.
You can also use normal EQ after the Grid for this. The important idea is that the body does not need to follow a note. It can stay in one frequency area and color the resonator.
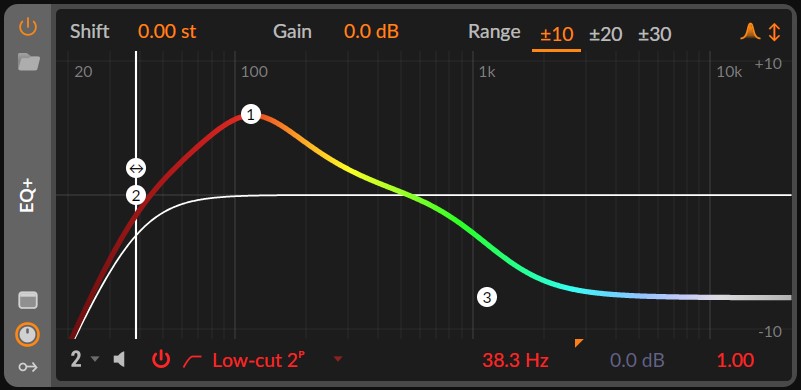
Here the EQ pushes around 100 Hz, cuts the subs, and shelves the highs to simulate a room or body response. This EQ is static and does not change with the pitch of the played note. It models a fixed, resonant body or the room the instrument is played in. You can do the same thing with impulse response samples in a much better and more realistic way, but an EQ also does an okay job most of the time.
I think the body is a very important part of the sound. It looks like just a small correction, but it has a big effect on how believable an instrument sounds. A piano, a guitar, and a violin are all based on the same basic idea, but they sound very different because they have very different resonating bodies. So the more realistic your body model is, the more realistic the whole instrument sounds.
Extracting the body, or the fixed frequencies of a body, is not easy. You can record rooms with impulse responses fairly easily, but recording the response of a small body or instrument is much harder. I have a fairly simple method using Unfilter, a plugin that tries to detect the static frequencies in a sound.
More details are in this video: Impulse Responses Without the Impulse.
Small Variations #
Once the basic patch works, try these changes:
- Use white noise instead of pink noise for a brighter exciter.
- Use a Pulse or very short oscillator blip instead of noise for a cleaner pluck.
- Mix a little dry noise with the comb output for breath or pick noise.
- Modulate the comb feedback slightly with velocity or a random value.
- Add a low-pass filter inside the feedback path if the comb gets too bright.
- Use several comb filters in parallel for more complex strings or metallic objects.
Be careful with feedback and resonance. Comb filters can get loud very quickly, especially when the resonator lines up with the input signal. Keep the monitoring level low and use a limiter while building the patch.
And that's already the core idea. You don't need a giant patch to start with physical modeling. You just need something that excites, something that rings, and optionally something that behaves like a body.
▶ Next Lesson: Timing, Triggers and Probability
◀ Previous Lesson: Poly Grid: Granular Synthesis
▲ Bitwig Grid Course Overview