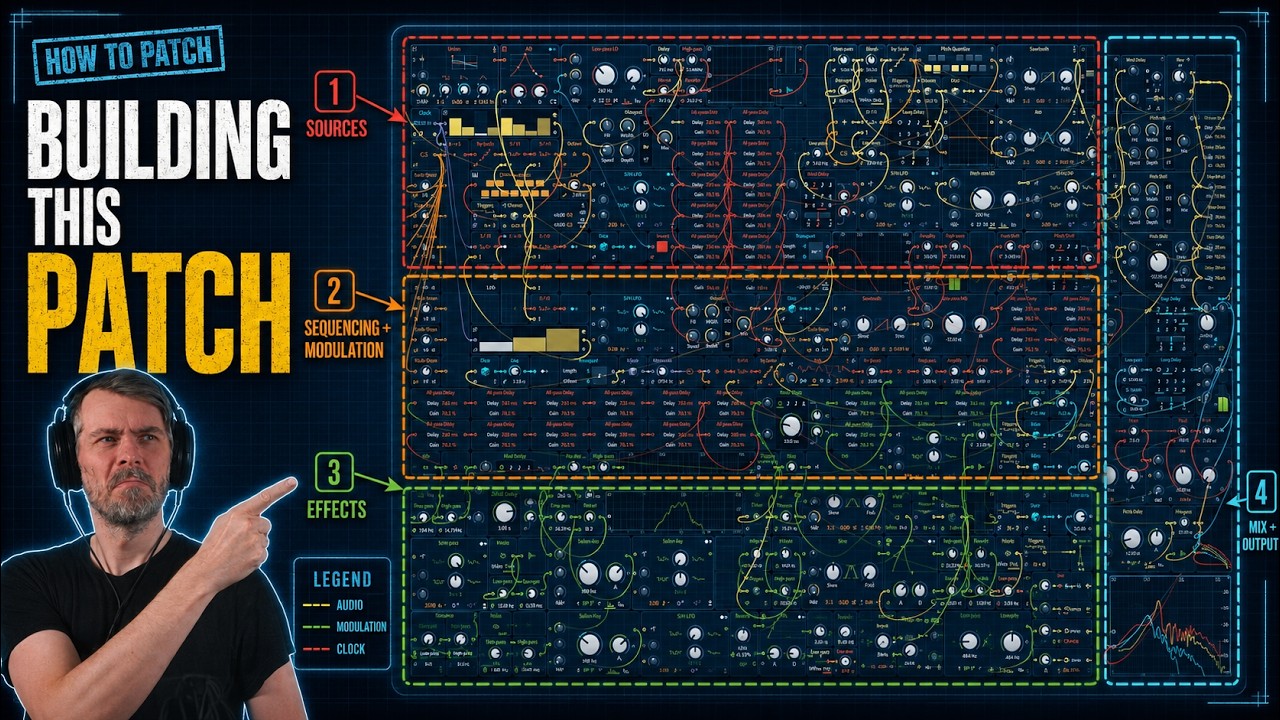
Bitwig Grid
Bitwig Platform
The Bitwig Grid is Bitwig Studio's modular environment. Instead of loading one finished device and only using the controls it already gives you, the Grid lets you build your own instruments, note processors, and effects from smaller building blocks.
For many people this looks technical at first, but the core idea is simple: you connect little parts together until the sound behaves the way you want. One module creates a signal, another one changes it, another one delays it, and another one controls it over time.
What the Grid is for
The Grid is useful whenever the standard devices feel too limited. Maybe you want a synth that behaves in a very specific way. Maybe you want an effect chain that reacts differently from the built-in presets. Maybe you want to generate notes, rhythm, or modulation from scratch. The Grid is where Bitwig becomes less like a fixed DAW and more like a creative construction kit.
Bitwig offers different Grid flavors for different jobs:
Poly Gridis usually used for building instruments and synth voices.FX Gridis for audio processing and effect design.Note Gridis for creating note and MIDI behavior before the sound even starts.
Why it matters
Learning the Grid teaches more than just one feature. It helps you understand how sound moves through a system. You start seeing that a synth is not magic. It is just oscillators, filters, envelopes, math, timing, and routing working together. That makes the rest of Bitwig easier to understand too.
The Grid is also a good bridge into broader sound-design ideas. If you have ever been curious about modular synthesis, custom effects, or generative music, this is one of the friendliest places to start because everything is visual and integrated into the DAW.
How this topic is organized
This page collects several layers of Grid-related material.
- Bitwig Grid Modules focuses on the small building blocks.
- Pure Data, Reaktor, and Max/MSP are related reference points when the discussion moves into more general modular thinking.
- The posts below show finished patches, lessons, and practical examples that use the Grid in a musical context.
A good way to start
Do not try to learn every module at once. Start with one simple patch and ask four questions:
- Where does the signal begin?
- What changes the signal?
- What controls the change over time?
- Where does the final result go?
Once those four steps make sense, the Grid stops looking random. It starts looking like a set of small, understandable decisions.
Also matches: Bitwig Grid, Note Grid, Note-Grid, Poly Grid, Poly-Grid, Notegrid, Polygrid, The Grid, FX Grid, FX-Grid, FXgrid
Posts in this topic

In this video, I discuss the new Note Grid device in Bitwig Studio 4.2 and how it can be used to create interesting patterns and chord progressions. I explain how the Note Grid is similar to the Poly Grid and FX Grid devices, but is specifically dedicated to node functions. I demonstrate how to use the Note Grid to create polyphonic and monophonic sounds as well as how to use it to harmonize with a chord track. Finally, I demonstrate how to use the Note Grid to target individual notes and transpose them.

This free to access course teaches you how to use Bitwig Studio's Grid. Learn how to use the Grid to build synthesizers, audio and note effects as a Beginner, step by step! This course is free and will be updated regularly with new content.

In this video, I explored the differences between the native Bitwig devices like EQ Plus and Flanger Plus, compared to the grid devices like Delay Plus and Polymer. I speculated that in the future, we may get container devices that allow us to build our own devices with DUI interfaces without having to hassle with the DUI designer. I demonstrated how to construct a Delay Plus-like device in the FX Grid, using a diffusion network, EQs, and a ducking knob. I concluded that while we can't replicate the Delay Plus exactly in the Grid, it is possible to create something similar in its place.

In this video, I showed how to create various effects, such as phasers, flangers, chorus, low pass and high pass filters, reverbs, and pitch effects, in the Bitwig Grid. I demonstrated how to use FX Grids and Chain Devices, as well as how to manipulate the delay time of a signal with an LFO and the Time Shift Device. I also showed how to create a multi-tap delay with the Long Delay and a Multi-Lay, as well as how to use the gates module to record and playback audio. Finally, I discussed the use of an AD envelope to reduce clicks in the signal.

Bitwig features three Grid devices for creating note FX, instruments, and audio FX. Learn their differences, why there are three devices, and how they interact with the rest of the Bitwig DAW.

Learn how to build complex ambient generator patches in Bitwig Grid by layering small modules for raindrops, wind, harmony, and reverb.

Build a Bitwig Grid ambient Dorian drone patch with slow chord progression, bass, shimmer diffusion, and random textures using compact sequencing workflows.

In this video, I demonstrate how to create a super simple patch for Euclidean rhythms in the grid. I show how it looks like in Hatefish, and then explain how to implement it in the grid. I explain the three most important parameters (steps, beats and shift) and demonstrate how they can be used to create interesting rhythms. I also show how to use macros to control the parameters and how to use the Grid Node Out plug-in to generate notes. Finally, I provide a preset to make it easier to use the patch.

In this video, I show how to use the FX Grid in Bitwig to clean up and quantize samples for easier use in a sampler. I go through the steps of using a loud split to remove noise, and then an auto level preset to normalize the sound. I also explain how to use a follower, latch, and logic modules to trigger recording and playback, which allows for quantization of audio. Finally, I show how to use the FX Grid for more creative effects.
A long Bitwig Grid build of an ambient generative patch with noise-driven note sequencing, all-pass reverb, and layered modulation techniques.

Recreate Serum Hyper/Dimension in Bitwig Studio or VCV Rack with Chorus+, FX Grid micro-delays, panning, and modulation for wide stereo unison.

In today's video, I show how to create a multi-band delay effect using the polymer synthesizer as input. I demonstrate how to use the FXgrid, filters, and a mod delay to create the effect. I also implement macros for resonance, feedback, and filter cutoff. To make changing the delay timings easier, I use a step mode interface. I explain the logic behind it and how to map it to each delay. I discuss the limitations of the grid for creating interface controls and the need for better interfaces. I give examples of how the effect sounds and suggest adding a convolution reverb. I also mention the possibility of using pitch quantization and panning for more control. Overall, it's a creative way to achieve a multi-band delay effect with a flexible interface.

Long Bitwig Grid patch-building session creating an ambient drone patch, with practical ideas for mono Grid setup, scale-quantized note generation, and noise-based textures.

In this video, I showed how to create generative music in Bitwig Studio without using the grid. I showed how to use the Grid Node Out preset, which can be used to get node information out of the grid into the Bitwig world. I also showed how to use a Polymer synth and a small delay, as well as how to use the steps mode, the LFO, and the Key Filter to modulate the pitch and gate. Finally, I showed how to use a Node Clip and an ABit Creator to generate random nodes.

In today's video, I show a trick for using the segments module in the grid. By misusing the modules and drawing in waveforms, you can create unique sounds like kick drums and percussion. This method allows for persistence and the ability to save presets, making it a versatile tool within the grid.

In this video, I explain how to use the grid in Bitwig Studio to calculate release time for a compressor based on beats instead of milliseconds. I show how to convert a ramp signal into a sound, measure the pitch using zero crossings, and then convert it to hertz and milliseconds. Although it's a hacky approach, it's a fun challenge and allows for time-based calculations in the grid.

In this video, I show how to create a sweep or riser from scratch using the face module in the Bitwig Grid. The face signal is perfectly synchronized with the BPM and allows for easy modulation of volume and other parameters. I also demonstrate how to use the trigger and dice modules to generate different sounds on the fly, as well as how to use a gate signal to make the riser playable as a clip. Finally, I discuss the ability to use different face tools and effects to customize and create unique risers.

In this video, I discuss different methods of synthesizing sounds inside the grid, including subtractive synthesis, additive synthesis, frequency modulation, physical modeling, and granular synthesis. I provide detailed tutorials on how to create your own oscillator and change the waveform over time using modules like steps, phaser, and value. I also demonstrate how to create an additive synthesizer by adding multiple sine waves with different frequencies and how to use a filter to modify the sound. Additionally, I show how to use granular synthesis and a resonator to create interesting sounds. Overall, the goal is to encourage viewers to create sounds for their projects rather than focusing on designing instruments. If you have any questions or comments, please leave them below, and don't forget to subscribe, like, and support the channel if you enjoy the content.