Bitwig Multi-Sampling Workflow - Create Reusable Multi-Sample Patches from Plugins
Bitwig Guide | Jul 28, 2022
To create a multi-sampler patch in Bitwig Studio, set up clips for each key and velocity layer you want to sample, then bounce these clips to audio files with clear naming conventions for easy organization. Once all samples are exported, drag them into Bitwig’s sampler, sort by file name, and manually assign velocity and key ranges for accurate mapping. Save this project as a reusable template, making it quick and efficient to sample any device or instrument in the future.
You can watch the Video on Youtube
- support me on Patreon
Short Overview #
In Bitwig Studio, I set up a reusable project for sampling any instrument, whether it's a VST, hardware, or a built-in device. I create clips for each key and velocity layer, carefully naming and adjusting their length to capture the sound accurately, including any reverb tails. Once everything is ready, I bounce all clips to audio and drag them into Bitwig’s sampler, mapping keys and velocities manually for full expressive control. While it's a bit tedious to set up, this method lets me easily sample and create multisample patches from anything in my studio, saving time and effort for future projects.
- Start by creating a MIDI clip with the notes and velocity levels you want to sample from the instrument or device.
- Name each clip using a clear convention that includes velocity and key information for proper organization and later mapping.
- Duplicate clips for each desired note and velocity layer, adjusting the velocities and renaming accordingly.
- Adjust clip length to ensure all reverb tails or sustained notes are captured; increase project length or tempo if needed.
- After setting up all the clips for each note and velocity layer, bounce each clip to audio, ensuring the output format meets your quality needs.
- Organize and sort the resulting audio files by name to simplify mapping and layer assignments later.
- Load the bounced samples into Bitwig’s Sampler device, using "Create new multi-sample patch" for easy mapping.
- Use sorting and velocity distribution tools inside the Sampler to assign samples to their corresponding key/velocity ranges.
- Manually adjust velocity ranges for each group if needed, since Bitwig might not recognize velocity from filenames automatically.
- Save the entire setup as a reusable project or preset for quick resampling of future instruments or devices.
- Optional: Fine-tune mapping for more efficiency by only sampling keys and velocities that are musically relevant, keeping the library compact and manageable.
Introduction #
In this guide, I will walk you through my process for creating a multi-sampler patch in Bitwig Studio from any instrument or preset. It doesn’t matter whether you are using a VST, hardware, or Bitwig’s internal device. I’ll cover practical steps, workflow optimizations, and naming conventions so you can efficiently set up your own sampling project, an approach you can reuse for future patches.
Setting Up the Sampling Clips #
First, I create a MIDI clip for each note and velocity step I want to sample. For efficiency, I do not always sample every possible key or velocity, although Bitwig allows you to be as detailed as you want, this can quickly become time-consuming. I generally recommend sampling every few notes and velocities; you can fill in the gaps with pitch and velocity mapping.
I make sure that the MIDI clips are long enough to capture the instrument’s reverb tail. Any part of the sound outside the clip boundaries will be cut off when I bounce the audio, so I sometimes extend the clip or slow the tempo to capture long sustains.
Naming Convention for Sample Clips #
Next, I use a strict naming system for each MIDI clip to encode both velocity and key information. For instance, B025_F0_CompGuitar means:
B025: 25% velocity (I sample in steps like 25, 50, 75, and 100%)F0: The root key for this sampleCompGuitar: An identifier for the preset or instrument
Having a consistent and machine-readable naming system here is essential. It allows Bitwig’s sampler to place samples on the correct keys and makes it easier to identify velocity layers. If necessary, a batch renaming tool can help further organize files later on.
Duplicating and Adjusting Clips #
Once the initial clip is set, I duplicate it for each velocity and key. This process is a little tedious, as Bitwig does not provide a way to bulk rename all clips automatically, but it’s only required once. I adjust the MIDI notes in each clip as needed for the range I want to sample.
Bouncing Samples #
With the clips set up, I select all of them and use the bounce function. I typically use 16-bit with dithering for smaller sample files, but 32-bit is also possible for higher quality, though unnecessary for most libraries. The bounced files will automatically appear in the project’s sample directory with the correct names.
Loading Samples into the Bitwig Sampler #
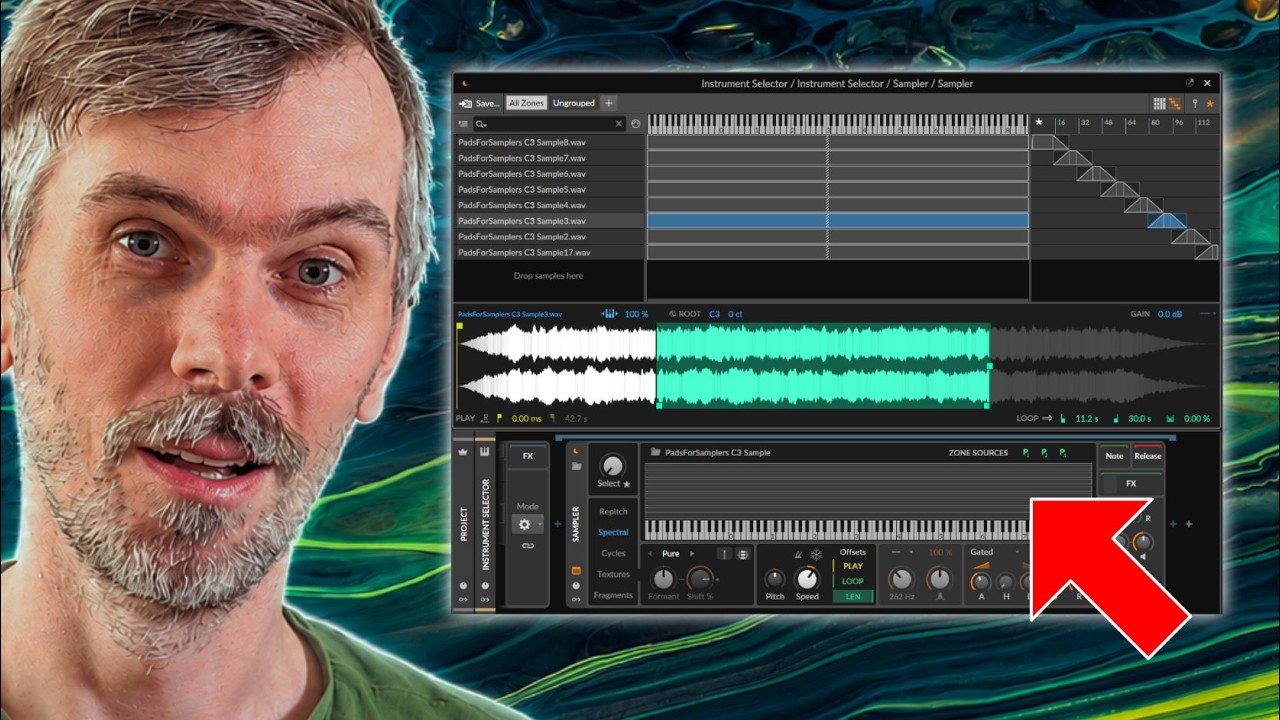
I open a new instance of the Bitwig Sampler, choose the multi-sample mode, and drag all my newly created samples into the mapping window. Thanks to careful clip naming, samples align automatically to their intended keys. Bitwig maps any gaps by extending zones between sampled notes.
Mapping Velocity Layers #
By default, Bitwig stacks all velocity layers directly on top of each other, so every layer triggers at all velocities. To fix this, I sort the samples by name. Then, I manually assign each batch, for instance, all B025 samples, to their correct velocity range using “Distribute velocity equally.” I repeat this for every velocity step.
Optimizing Sample Mapping #
I fine-tune the sample mapping zones so each velocity layer lines up with its neighbors. For large libraries with many layers, this can get cumbersome, but with four or so velocity layers per key, it is manageable.
Saving and Reusing the Sampler Patch #
After mapping, I save the sampler patch as a Bitwig preset. I also save the entire Bitwig project as a template, it can be reloaded quickly for sampling new devices, simply by replacing the source instrument.
For broader workflows around storing and reusing patches, device chains, and shared sounds, see Bitwig Presets.
Context: Sampling Concepts Explained #
Why Sample Multiple Velocities or Keys? #
Sampling different velocity layers and keys captures the realistic response and tonality of an instrument. Some hardware samplers and samplers in other DAWs automate this mapping, but in Bitwig, some manual workflow is needed.
Reverb Tails and Clip Length #
If your source has a reverb or long release, always ensure your bounced clip contains the full decay. Truncation leads to unnatural-sounding samples.
Root Key and Sample Mapping #
The file name embeds the root key, allowing Bitwig to pitch samples accurately. Missing keys are filled by stretching or shrinking adjacent sample zones.
Round Robin Layering #
Bitwig’s current sampler lacks a built-in “round robin” feature, which is often used to avoid repetitive machine gun effects. There are possible workarounds using groups or randomization, but these get complicated and are usually unnecessary if you avoid high-density sampling for percussive sounds.
Conclusion #
With these steps, building a reusable multi-sample patch in Bitwig becomes smooth and systematic. Although initial setup might be somewhat laborious, it more than pays off with each new patch. You can make your setup as detailed or simple as you need, tailoring it for everything from basic synth stabs to intricate multi-velocity acoustic sounds. Store your project template and keep expanding your personal sample library with every new instrument you encounter.
Full Video Transcription #
This is what im talking about in this video. The text is transcribed by Whisper, so it might not be perfect. If you find any mistakes, please let me know.
You can also click on the timestamps to jump to the right part of the video, which should be helpful.
Click to expand Transcription
[00:00:00] So let's say in Bitwig Studio you have this device here, or this preset, and it doesn't
[00:00:06] matter if it's actually a VST instrument, if it's a hardware instrument, or it's a Bitwig
[00:00:11] device here, like this one, it doesn't matter.
[00:00:15] So how do you create a multi-sampler patch from this one here?
[00:00:19] And this is how it sounds, by the way.
[00:00:22] That's my comp/guitar preset, and yeah, I already made a video on this on my other channel,
[00:00:31] but it's not really correct, and it's also old, and I want to show you how this works.
[00:00:36] So let's start here by creating a clip, and you want to sample maybe not every velocity
[00:00:43] step, and you want to maybe not sample each key, but you can do that if you want to.
[00:00:49] You can go into that detail if you want to, but it's a lot of samples, and it involves
[00:00:53] a lot of steps, but if you put in the time and work, you can recall this project every
[00:00:59] time and can reuse this project to sample all kinds of devices.
[00:01:04] So here I show you first how this works.
[00:01:07] So we created a clip here, inside this clip we start to sample maybe at Z0, and you have
[00:01:15] to make sure that the reverb tail, if there's a reverb on there maybe, that the reverb tail
[00:01:20] is inside the boundaries of this clip, because we right-click later on this clip and just
[00:01:26] hit Bounce, and everything that's outside of these boundaries here are cut off.
[00:01:32] So make sure that the reverb tail is actually in it.
[00:01:35] If it's a long reverb tail, make the clip longer, or maybe slow down here the project
[00:01:42] tempo, it's the same effect kind of, it also makes here the sustain a bit longer.
[00:01:48] So yeah, make sure the sustain is also in there if you have a sustain sound, so we can
[00:01:52] maybe put in later on some loop points, but here for the guitar I think it's just a percussive
[00:02:01] kind of a guitar sound, so I just keep it short, so you can see we can make the clip
[00:02:09] here a bit shorter, something like this, that's perfectly fine.
[00:02:14] So all we do now is basically we rename the clip here, we click on it, and on the left
[00:02:21] side here in the Ranger clip we can give it a name, and I usually start with something
[00:02:26] like B for Velocity and say, we want to stay with 25% Velocity, so we go up in 25% steps,
[00:02:37] so we have four Velocity steps for each key.
[00:02:43] And then the key is the zero, and this one is read by the sampler itself, so it's very
[00:02:48] important, so the sampler then takes this number and puts it on the right root key for
[00:02:56] each sample you drag in.
[00:02:59] So after that you can give it a name, and maybe use the Sphere Comp guitar, and it's
[00:03:07] not really important, you can maybe later on then go into the file system, use a mass
[00:03:11] renamed tool and rename all the samples here, so you can also use maybe something generic
[00:03:18] like Sample and replace it later on with such a tool.
[00:03:23] But here I am going for Comp guitar, and then the rest is, it doesn't matter, it puts a
[00:03:31] slash bounce on it every time you bounce this clip.
[00:03:34] So this naming convention is more or less important to have all this in, and yeah, you
[00:03:41] go on to make another clip here, and in this one we go for Velocity 50 maybe, and maybe
[00:03:55] we also have to take into account this 100%, this maybe not, yeah, maybe go here for 025
[00:04:02] and 05, because later on we need to use this here to sort the files by name, and then you
[00:04:11] can more or less figure out which samples go to Velocity Layer 1, Velocity Layer 2
[00:04:19] and so on.
[00:04:21] Okay, so next one would be here 75, and this one is 100, and yeah, what you can do also
[00:04:42] is here use Shift and Tab, so you have the detail editor in here, and you can still
[00:04:51] see the instrument down here, and you can also switch instead of showing the clip here,
[00:04:58] which is basically just this highlighted clip here, and switch it to the track view, so
[00:05:04] you can see all clips, and all nodes in all clips, right, so you can easily rename this
[00:05:10] here, and you can also have control over each these nodes in each clip, so we can go here
[00:05:17] to, this is 25% Velocity, this is 50% Velocity, this is 75, and this is 100, so let's test
[00:05:34] this here quick.
[00:05:41] Okay nice, so now we can move on to the next key, and say this is the same, right, so now
[00:05:49] we can decide if we want to sample each key, which would be also very time intensive, and
[00:05:56] you can do that because you only have to do this once, this is just a setup, basically
[00:06:00] to show you how you can set up such a project, and how this works, but once you've done
[00:06:05] this, then you can recall the project, exchange here the device or the instrument, and just
[00:06:12] re-sample, and you have a new multi-sampler patch, so let's go here for something in between,
[00:06:21] this is F0, so we have to rename here everything, Velocity steps are the same, we even cloned
[00:06:30] here all the Velocity steps, so we only need to rename basically here the clips, so this
[00:06:36] is F, this is F, it would be nice to actually select all this and just replace it, but it's
[00:06:43] not possible, F, F, and so on.
[00:06:56] So and then you do the same for the next keys, until you reach basically the end, let's go
[00:07:05] for C1 here, C1, and like I said, if you put in the time, it's worth it because you can
[00:07:20] recall it every time, you don't need to do this every time, it's just one one time setup,
[00:07:25] it's very important to remember, and maybe I skip ahead here, okay, so I redid everything
[00:07:37] here from Z0 to what do we have here, C F5, okay, and only work or hard work was basically
[00:07:52] to rename all this here, even then just select it here, a bunch of clips here, just duplicated
[00:08:05] everything, selected the keys, pitched it up and then just renamed it, so it was not
[00:08:11] really a hard task to do, it's just a bit tedious and you have to do it once, just like
[00:08:18] I said at multiple times in the video for some reason.
[00:08:22] So now that we have this here, we can also recheck maybe some of the entries here, let's
[00:08:29] see, this is pretty short, so the samples actually way too long, right, so we can make
[00:08:36] some adjustments to the length of your samples to make the sample space a bit smaller if
[00:08:41] you want to, so the easiest way to do this is here just to increase the playback speed,
[00:08:48] right, but we also have to make sure that the lowest sample which is usually a bit longer
[00:08:55] than, yeah, it's still okay, I guess we can even make this a bit faster here, so this
[00:09:10] is basically all about making samples size small.
[00:09:14] So now that we have this, we can switch back here with shift and tap, to this to you, we
[00:09:20] named everything and all we have to do now is to save this as a project and then come
[00:09:26] back to it when we want to do something or when we want to re-sample a device.
[00:09:32] So right click here on all these samples, we have to of course select every sample or
[00:09:36] every clip here, right click on it, choose bounds and then post fader if you want to
[00:09:41] have all the FX in it and I usually go for 32-bit, but you can also choose 16-bit and
[00:09:49] dither ring if you want to, if you want to keep it small, but I go here for 32-bit, it's
[00:09:57] probably also way too much for a sample library, maybe go for dither here in 16-bit, it's fine,
[00:10:03] then just hit okay.
[00:10:05] You can see now it bounces every clip here to a sample or file actually and it's all
[00:10:14] collected in the project directory as you can see with the right names in it and all
[00:10:21] we have to do now is to create a new sampler and hit here create new multi-sample patch
[00:10:32] and now we select all these samples here, shift and old shift and click, drag these
[00:10:40] in and when you switch here to the mapping you can see that we have here all the samples,
[00:10:46] this is f0, f0 is the root node exactly on f, also c1 is perfectly aligned here with
[00:10:54] c so we have the right root key for each of these samples and you can see even the ranges
[00:10:59] are correct so they map out the space from, so we sampled f0 and everything is covered
[00:11:06] from below, what's this here, e0 up to, yeah, b or a, I don't know exactly, so everything
[00:11:19] in between is covered basically key-wise.
[00:11:22] The only thing that we have to do now is to separate the velocity steps, you can see
[00:11:27] here all velocity samples are played at once because the Bitwig sampler doesn't recognize
[00:11:34] anything here in the file name so we have to do it manually but there are some tricks
[00:11:38] to it so the first trick is actually to sort the samples now for name and this gives you
[00:11:45] basically everything that says a low number first so we have now every 25% velocity sample
[00:11:53] here in a row one after the other right and then we have the 50 and then we have the 75
[00:11:59] and 100 and so on so we have to sort it by this and what I do usually is to just select
[00:12:06] the first one of these bunches here so the first 25 then hold control and select the
[00:12:12] second one which is 50 hold control and select here the first 75 hold control select the
[00:12:19] first 100 now we have here selected all the first velocity samples and now we can right
[00:12:26] click on it and can say distribute velocity equally and it tries to map here the lowest
[00:12:33] to from 0 to 32 and you know up to 127 which is the highest velocity range so now that
[00:12:43] we have this we can select the other ones these ones here and just snap it to the exact
[00:12:51] same size and also these ones here so it's maybe a bit harder to do when you have a lot
[00:13:02] of velocity steps but when you have for each sample a different velocity step then it's
[00:13:07] comes pretty tedious I would say and I hope bitwig includes maybe some kind of recognition
[00:13:16] for this for the file names so we can put in here actually a velocity name and bitwig
[00:13:24] uses that would be nice so now that we have this we pretty much done that's it we can
[00:13:31] save this preset now here or even use the yeah multi sampler editor here and save it
[00:13:40] as a new multi sample patch and maybe can also reuse this inside the grid inside with
[00:13:47] the sampler and then we can play it maybe a longer release time sadly inside the bitwig
[00:14:14] sample there's nothing really like round robin if I'm not wrong maybe you can fake it in
[00:14:23] a way but I haven't found really a way to do this maybe you can use some grouping actions
[00:14:29] or maybe use the select and randomize the select here to select different layers but
[00:14:36] it makes everything more complex we have to take multiple velocity samples from the same
[00:14:44] velocity setting from the same key you know it just multiplies everything by how many
[00:14:49] steps you want to make in my opinion it's perfectly fine to just sample three or four
[00:14:56] keys from an octave and just take the octaves that make sense for this instrument so for
[00:15:04] the guitar here for example you don't need to sample C0 that's way too low nobody probably
[00:15:13] plays down here I don't know so you have to choose ranges that make sense to keep everything
[00:15:23] small and controllable you don't need to sample everything in high detail so yeah like I said
[00:15:31] multiple times save this as a preset make it as detailed detailed as you want save it
[00:15:37] for later use and then create multi-sampler patches for it from it it's actually not that
[00:15:44] hard to do
[00:15:45] [BLANK_AUDIO]