Sampling
Production Techniques
Sampling means using recorded sound as musical material. That sound can come from a drum hit, a voice, a field recording, a vinyl rip, a hardware instrument, a plugin, or even a sound you made yourself five minutes ago.
Once it is captured, you can cut it, pitch it, stretch it, layer it, map it across keys, or turn it into something that no longer sounds like the original source.
Why sampling is so important
Sampling sits between recording, sound design, and composition. It is one of the fastest ways to move from the real world into a musical idea. You hear something interesting, capture it, and suddenly you have new raw material for rhythm, texture, melody, or atmosphere.
It is also a very practical technique. You do not always need to synthesize everything from scratch. Sometimes the right sample already contains the color, imperfections, and detail you want.
What sampling can be used for
- building drum kits and percussion layers
- turning instruments into playable multisamples
- stretching loops into a different tempo
- resampling your own sounds to create new textures
- using found sound to add character and realism
That is why sampling shows up in so many different genres and workflows. It can be clean and controlled, or rough and experimental.
Source sound matters
One of the simplest production lessons is that good source material saves time. If the sample already has the right texture, punch, or tone, you do not need to force it into shape later. Sampling is not only about editing. It is also about choosing better material at the start.
At the same time, bad or unusual material can become great if you transform it in the right way. A boring sample can turn into a useful one once it is pitched, layered, distorted, reversed, or chopped.
Main branches on this page
- Multisampler focuses on turning instruments into mapped playable patches.
- Sampler Stretching focuses on keeping material in sync while changing pitch, tempo, or playback behavior.
Those two pages cover a useful split inside sampling: one side is about instrument building, the other is about time and playback manipulation.
A simple way to learn it
If you are new to sampling, start with one short sound and ask four questions:
- What happens if I pitch it?
- What happens if I shorten it?
- What happens if I loop or stretch it?
- What happens if I layer it with something else?
That process teaches the real power of sampling very quickly. The posts below then show how those same ideas are used in larger production workflows.
Also matches: samplers, sampling, sampler, samples
Posts in this topic

The sampler in Bitwig is a highly versatile tool that allows users to create a wide range of sounds by slicing, stretching, and creatively modulating samples, making it possible to produce entire tracks with just a few devices and effects. The guide demonstrates practical techniques for syncing drum loops to project tempo, slicing samples, and turning any audio into instruments or pads using modulation and filtering, offering endless creative possibilities without the need for additional plugins. By experimenting with simple recordings and leveraging Bitwig’s modulation system, users can achieve unique and professional results, illustrating the sampler’s power for music production.

In this video, I discuss Visco, a new drum sampler that was released five days ago. It is a unique drum sampler that divides the samples into the spectral domain and allows for morphing and twisting using modifiers. This tool is perfect for sound design and specifically designed for percussive sounds.

In this video, I explain how to replicate some of the features of the Amiga sampler in Bitwig Studio. The Amiga computer in the 90s had limitations in terms of sampling quality and space, resulting in a distinct sound with artifacts. By using the bit reduction, sampling rate, and key tracking features in Bitwig Studio, you can achieve a similar sound and even simulate slicing and stretch modes.

To create a multi-sampler patch in Bitwig Studio, set up clips for each key and velocity layer you want to sample, then bounce these clips to audio files with clear naming conventions for easy organization. Once all samples are exported, drag them into Bitwig’s sampler, sort by file name, and manually assign velocity and key ranges for accurate mapping. Save this project as a reusable template, making it quick and efficient to sample any device or instrument in the future.

This video explores how to recreate and expand on Bitwig Studio's granular sampler textures mode using note repeat and modulation devices, allowing for more creative control over grain shape, pitch, and playback position. By combining multi-samples, note effects, randomization, and step modulators, you can achieve evolving and complex granular textures well beyond the limitations of the default sampler. These techniques enable richer sound design possibilities, easily adjustable and even better visualized within the Bitwig Grid for advanced users.

In this video, I showed how to use XO to Drum Sampler by XLN-Audio. I showed how to increase the scale of the GUI, the two main tabs, Edit and Space, the sample layers, the sample editor, the global settings, the mastering section, the space tab, and the search function. I also showed how to create a groove by using the step sequencer, how to use the sample combine and randomize button, how to use the preset browser, and how to export the groove. XO is a great drum sampler and it is currently available for free if you upgrade your plan of Bitwig Studio.

In this video, I share my process for creating ambient music using samples from YouTube. I demonstrate how to record audio from the Windows output and use it in a granular sampler to create unique pad sounds. I also incorporate a minimal beat, piano melodies, and effects like reverb and delay to build a chill-out tune.

In this video, I demonstrate an interesting technique for creating ambient pad sounds using the sampler in Bitwig. I start by recording sample material from old synthesizers and then load them into the sampler. By utilizing cycles mode, voice stacking, and modulation, I am able to create unique and evolving pad sounds with ease.

In this video, I demonstrate a workflow for creating complex patterns and ambient songs using the Trident synthesizer. By sampling different presets from the bell and mallet category, slicing them, and renaming the files, I can load them into a sampler to create a unique and dynamic sound. This method allows for easy experimentation and can be applied to various genres, from ambient to percussion.

In today's video, I'm introducing the Kick Ninja VST plugin, which stands out from other kick drum synthesizers because it allows you to recreate kick drums from samples using AI and features pitch tracking for customizable 808 and trap sounds. You can drag in samples to analyze and mimic the pitch envelope and attack phase, and there's also a useful export feature to easily drag samples into your DAW. The plugin includes typical oscillator and sampler functions, along with distortion and compression, making it a versatile tool for creating unique kick sounds.

I recently discovered that you can use XO as a sample browser in Bitwig Studio. By holding control and dragging samples out of XO, you can put them in samplots, drum machines, tracks and clips. You can also use a drum sequencer with the same mapping as XO and export the entire drum hit or individual samples. This makes it easier to review samples, select the right sample and quickly drag them into Bitwig. It's the missing sample browser I always wanted and makes for an efficient workflow.
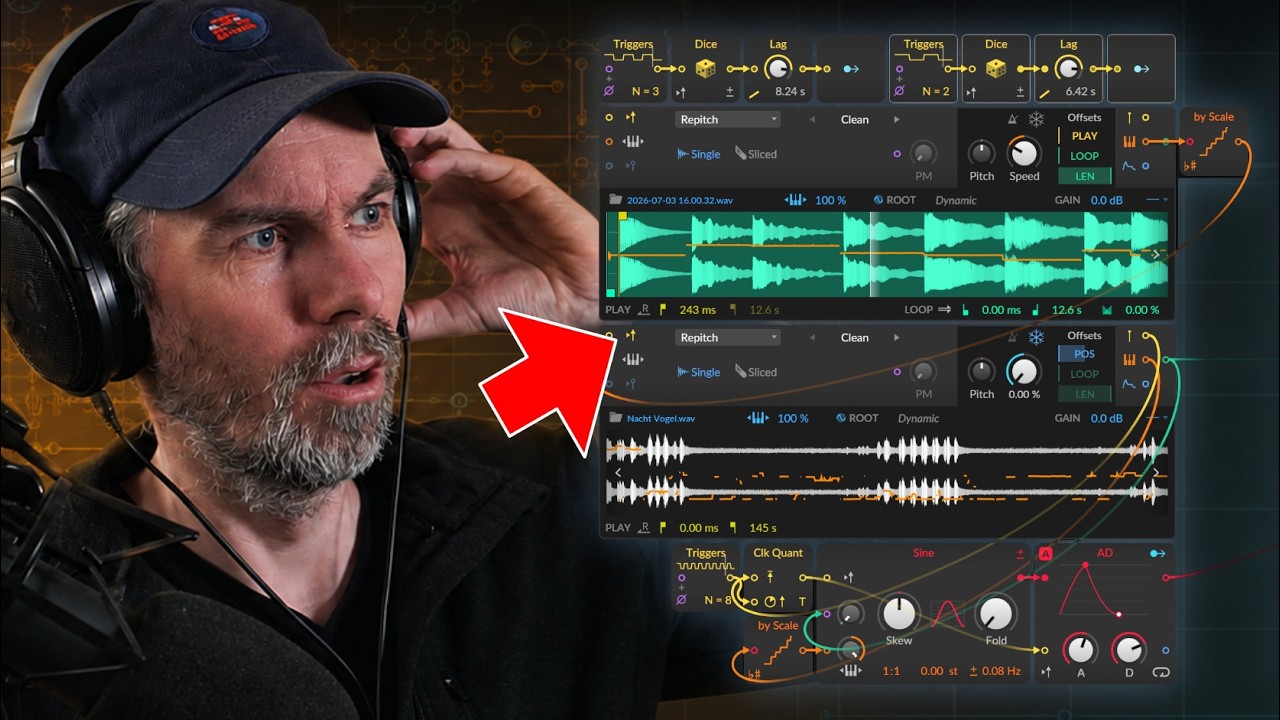
Learn how to use Bitwig Studio 6.1 Grid Sampler analysis out ports to extract pitch, onsets, and envelope for sample-based sequencing and pitch correction.

I opened up Bitwig Studio and had no plans for what to do today. I started experimenting with the new sampler and found it was great for sampling my voice and other sounds. I also used the convolution reverb to create rhythmic noise convolutions. I explained the pitch hurts module and demonstrated how to use Poly Grid to create melodies. I added some effects and a supermassive to create an underlying drone sound. The track doesn't make sense, but it was a fun experiment.

In this video, I show how to record your microphone and convert it into MIDI notes to trigger random samples in Bitwig Studio. To do this, I use a trigger to trigger the kick drum, snare, and hi-hat samples, and a hardware device to select the microphone input. I also use an auto-leveler with a follower, threshold, and sustainer to amplify the vocals and filter out noise. To separate the sounds, I use a sound key filter with a bandpass, low pass, and high pass, and use logic to exclude certain combinations of triggers. Finally, I use a quantizer in trigger mode to put all the triggers on the grid. Overall, this process requires a lot of tweaking and filtering to find the right sweet spot, but it can be done in Bitwig Studio with some experimentation.

In this video, I take samples from the Intimate Noise page and try to create a track. I download the free sample pack and explore the different folders, including pads and drones, one shots, and sequences. I start by using the kick samples and creating a drum loop. Then, I incorporate some of the pad samples to add texture to the track. I manipulate the sounds using different effects and plugins, such as the Hornet plugin and the Sonable smart compressor. I also create a baseline using the notes provided by the pad sample. I continue to build the track by adding more elements, including chords, FX sounds, and melodies. I use a pitch shifter and random modulators to add character and variation to the sounds. I group the different elements together and apply sidechain compression using the kick drum to create a pumping effect. Finally, I do a quick mastering using the Allzone Elements tool to ensure the track reaches the desired loudness. Overall, the goal is to create a deep house track using the samples from the Intimate Noise sample pack.

In this video, I share a new preset for the Bitwig sampler that I created from samples recorded on my friend Jericho's new MFP Synth Pro. It's an 8-voice polyphonic synthesizer with a vintage sound that I love. The preset is free for my Patreon subscribers, and all you need to do is tweak the remote controls to create different sounds. I also show a new feature in Bitwig Studio 3.2 beta that allows for easier use of the preset. The preset includes pitch mode, voice stacks, filter envelopes, and more. I also recommend checking out Jericho's channel for analog and euro rack content. Overall, I hope you have fun with this preset and leave any questions or feedback in the comments.
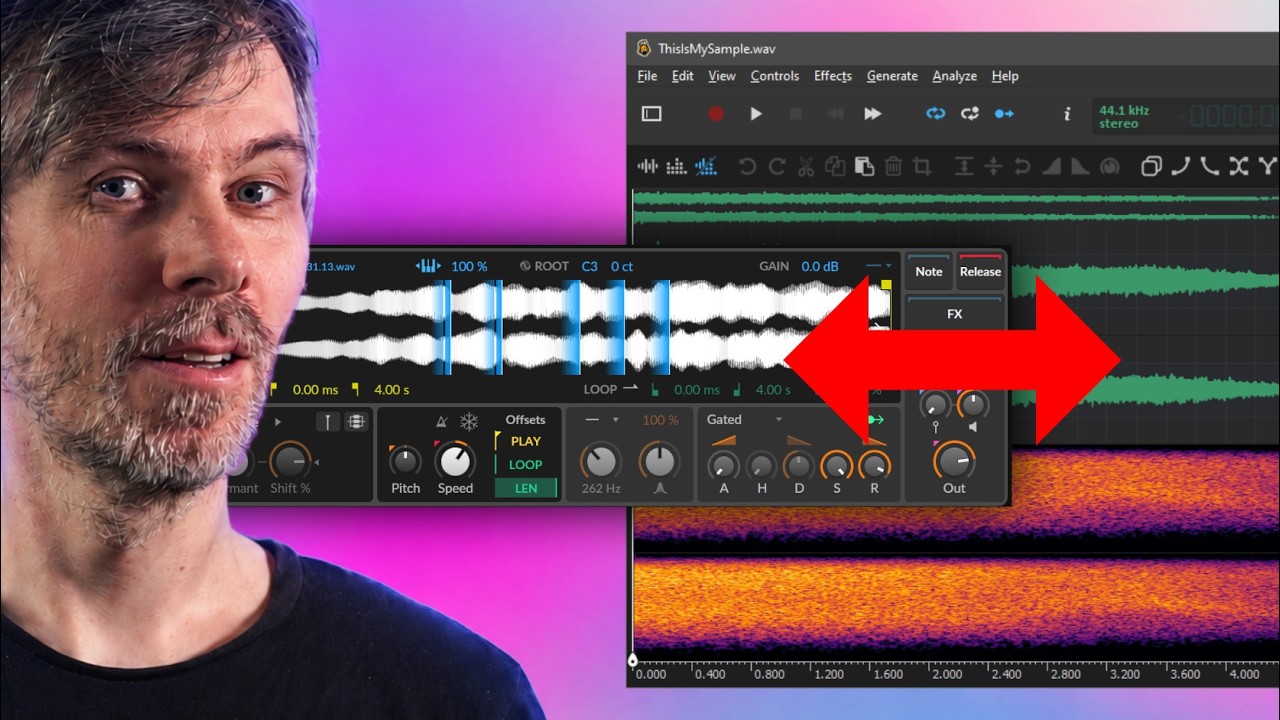
Edit Bitwig Studio 6.1 samples live in Ocenaudio and update Sampler instantly; use Collect and Save to avoid changing original files.

In this video, I introduce the Evolving Paths preset and demonstrate how it works in Bitwig Studio. The preset uses the XY instrument, which features four samplers, each with 40 samples that can morph between states. I explain how to use the mod wheel to change the position in the sample and how to select different samples for each of the boxes. The preset is available for purchase on Gumroad or for free for supporters on my Patreon page. Overall, it's a fun and affordable tool to experiment with and create unique sounds.