FX Grid - Custom Filters
In the last lesson we built a reverb. In this one we build filters, our own filter shapes, the kind you find in synths like Serum but designed by hand inside the FX Grid.
This lesson is based on one of my videos, where I design custom filters for a Drum and Bass reese bass:
First: Two Different "All-Pass" Modules #
This trips a lot of people up, so let's clear it up before we build anything. The Grid has two separate modules with "all-pass" in the name, and they are not the same thing.
| Module | Controls | Used for |
|---|---|---|
| All-Pass Delay | Delay time 0-999 ms and gain 0-100% (acts like a dry/wet plus feedback compensation, where 100% is described as canceling the effect). Has internal feedback. | The all-pass reverb from the previous lesson. The delay time sets the diffusion timing. |
| All-Pass | A single frequency knob 19.4 Hz-33.5 kHz and a poles dropdown (1p, 2p, 3p, 4p, 5p, 6p). No delay time. | The custom filters in this lesson. The frequency sets where the phase flips, the poles set how many times. |
So: the reverb uses All-Pass Delay (time + feedback). The filters use All-Pass (frequency + poles). Same family idea, phase manipulation, but very different modules. For the rest of this lesson, "all-pass" means the All-Pass filter module.
The Core Idea #
An All-Pass module passes every frequency through at the same volume. It does not make anything louder or quieter. What it changes is phase: it delays some frequencies relative to others, and the frequency knob decides where that phase shift happens.
On its own you basically cannot hear it. The magic appears when you blend the all-pass signal back with the original dry signal:
- Where the two signals are in phase, they add up and get louder.
- Where they are out of phase, they cancel and get quieter.
That pattern of reinforcement and cancellation is a filter shape. By choosing the all-pass frequency and the number of poles, you decide where the peaks and notches land. This is the whole technique.
Build a Custom Filter #
You need a sound with lots of harmonics to hear this clearly. A sawtooth reese bass is perfect (a subtractive saw source), but any bright sound works.
- Put an FX Grid after your instrument.
- Add a Blend module. Blend mixes two audio signals.
- Feed the Audio In straight into the first input of the Blend. This is your dry signal.
- Feed Audio In into an All-Pass module, then into the second input of the Blend.
- Send the Blend output to Audio Out.
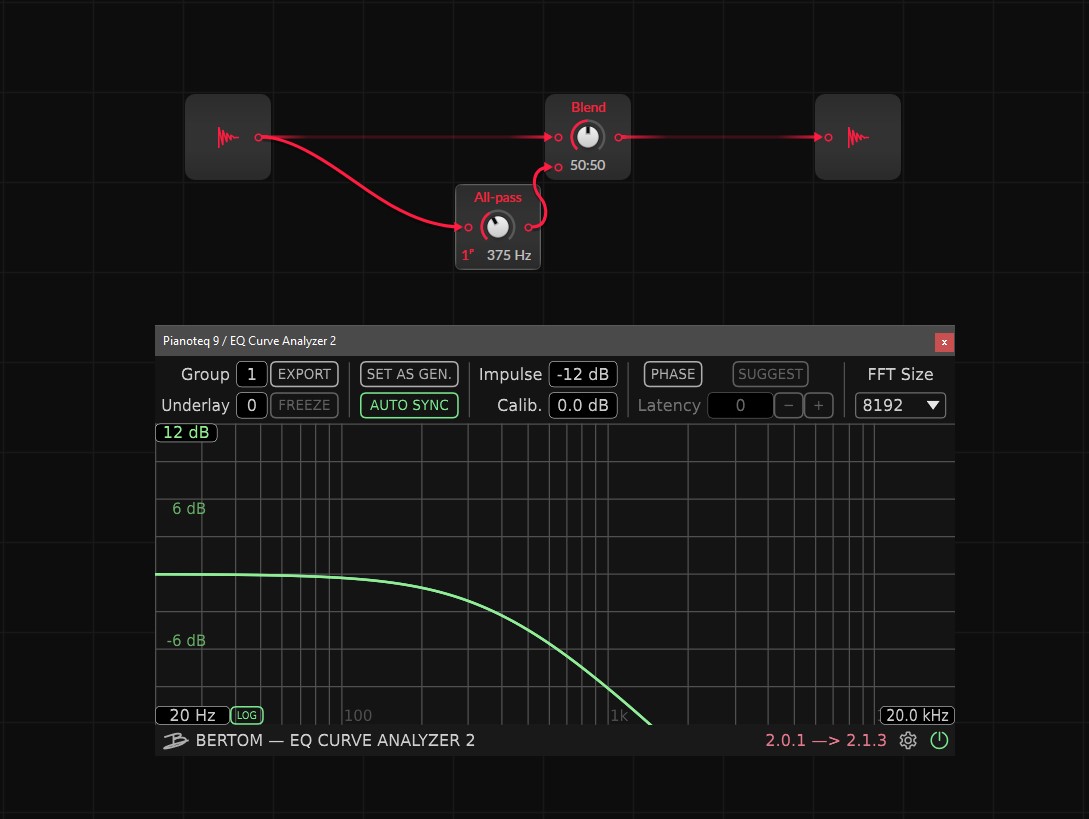
With the All-Pass set to 1p, blending dry plus all-pass gives you a low-pass filter. Sweep the all-pass frequency knob and you hear it open and close like a normal cutoff.
Flip it with Invert #
- Add an Invert module on the all-pass path (it flips the phase/polarity of the signal).
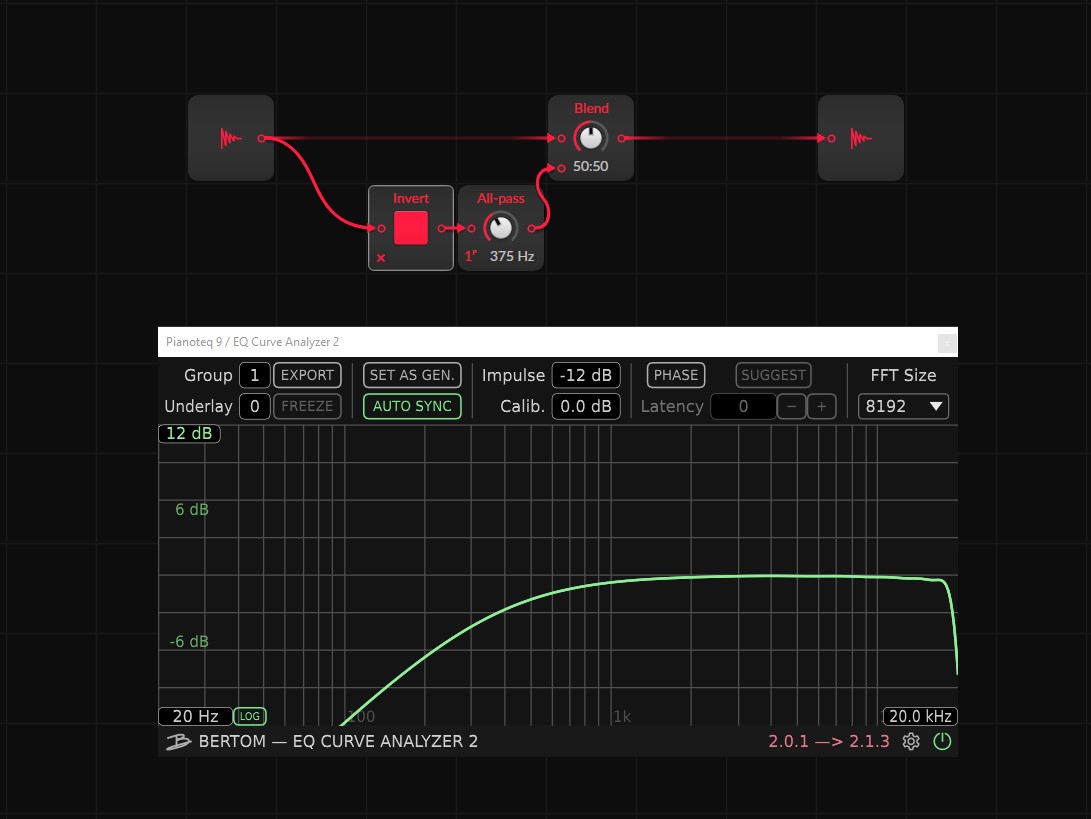
Now the cancellation happens on the opposite side and you get a high-pass filter. One module turned the low-pass into a high-pass.
Change the poles for band-pass and notch #
- Switch the All-Pass to 2p.
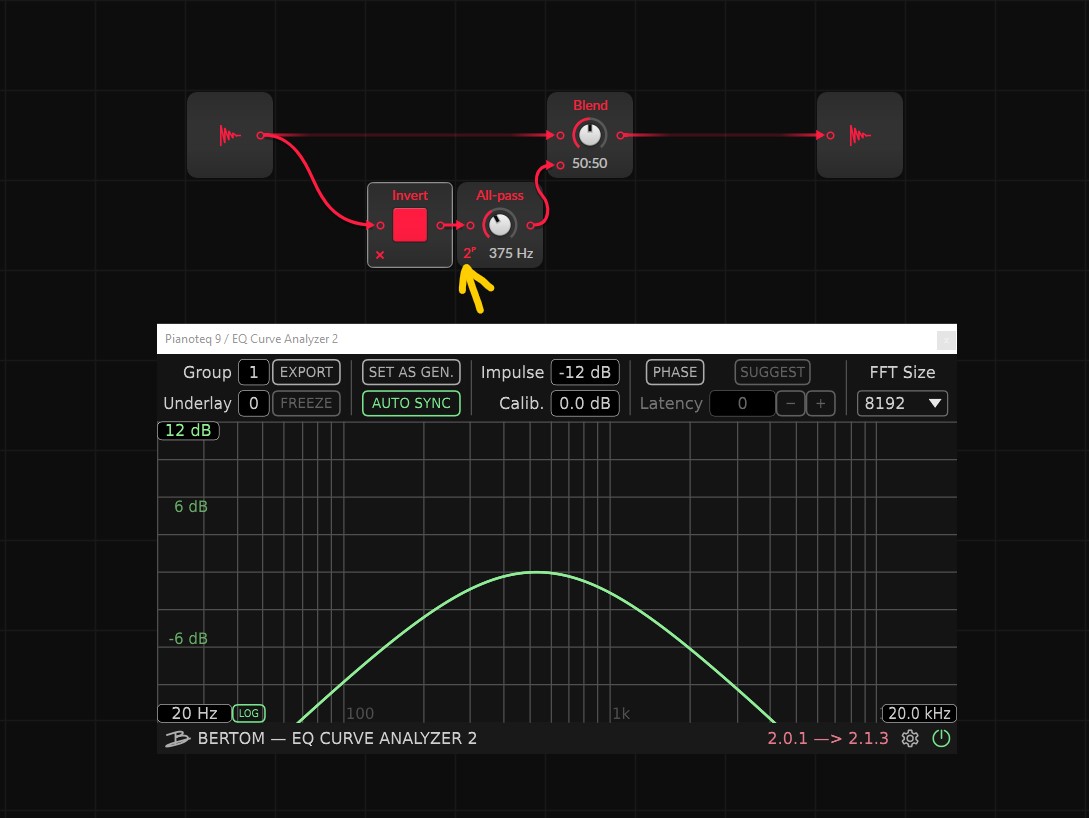
Two poles means two phase flips, so now you get a band-pass (or a notch with Invert off). More poles equals more phase rotations equals more notches and a steeper, more complex shape.
Stack Them for Custom Shapes #
This is where it gets fun. Add more All-Pass modules, each with its own frequency and pole count, and combine them:
- Put several all-pass stages in series to deepen and sharpen a notch or band.
- Run parallel all-pass paths (each with a different frequency and poles) into more Blend or mixer modules, inverting some of them.
- Because each stage can sit at a different frequency, the notches land at different spots and the curve starts to look mirrored across the spectrum. This is what makes a "mirror" or "morph" filter.
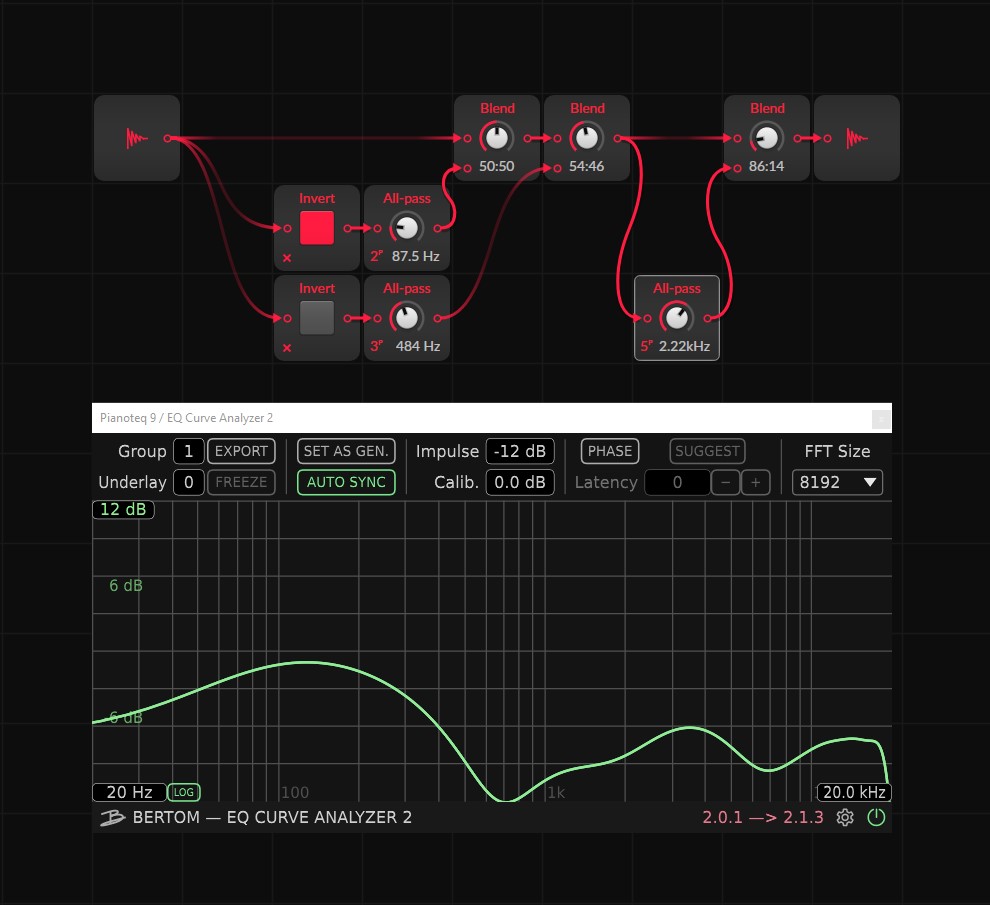
You are not designing a textbook low-pass anymore, you are drawing your own filter response with peaks and dips wherever you want them.
Turn It Into a Playable Filter #
A custom shape is only useful if you can move it:
- Add a Macro (or any modulator) to the device.
- Map it to the frequency knob of every All-Pass module at once, by the same amount.
- Now that single macro sweeps your whole custom filter across the spectrum, exactly like a cutoff knob, but the shape being swept is the one you designed.
You can also build a morph knob: instead of moving all frequencies together, map the macro to change several all-pass frequencies and pole-related amounts by different amounts, so the filter shape itself transforms as you turn the knob.
Why It Works #
Every All-Pass module rotates the phase of the signal around its set frequency. When you sum that phase-rotated copy with the untouched dry signal, frequencies that ended up out of phase cancel and frequencies that stayed in phase reinforce. The frequency knob slides the cancellation point up and down; the poles setting adds more cancellation points and steepens the slope; the Invert module swaps every peak for a notch and vice versa. Stack a few of these and you can sculpt almost any response by ear.
Small Variations #
- Put a low-pass before the whole network so you only shape the upper frequencies and leave the bass untouched. Great for keeping a reese bass solid at the bottom.
- Stereo trick: filter only the left channel with one all-pass network and only the right with another. The differences between the channels add width to the sound.
- Save your favorite network as an FX Grid preset and reuse it as a custom filter in other tracks.
- Combine this with the all-pass reverb: a custom filter into a diffuse tail is a very "you" sound.
This whole approach is just a dry signal blended with a handful of All-Pass modules, nothing more. If you want more grid-built effects in this style, I have a video on building your own audio FX in the Grid.
▶ Next Lesson: FX Grid: Chorus
◀ Previous Lesson: FX Grid: All-Pass Reverb
▲ Bitwig Grid Course Overview