FX Grid - All-Pass Reverb
Now that we know how the FX Grid works, let's build a real effect with it: a reverb. Not by loading a plugin, but by designing the diffusion ourselves out of a handful of all-pass delays.
This lesson is based on my video, where I build exactly this patch and also show a small all-pass reverb calculator I made for choosing the delay times:
You can also read the full write-up on the blog.
The point of building your own reverb is not to replace a polished plugin. It is to understand why some reverbs sound smooth and others sound like a stuttering delay, and to get spatial textures you cannot get from a stock preset.
What an All-Pass Delay Does #
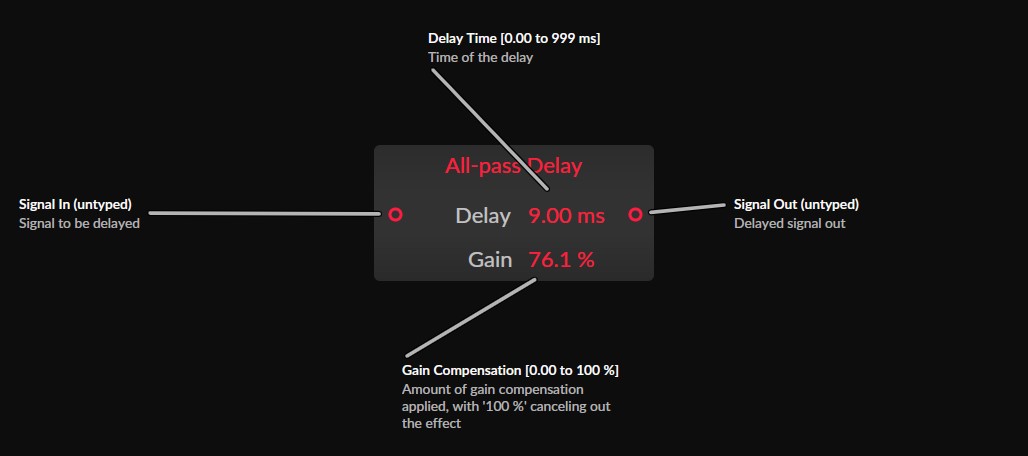
An all-pass delay changes the phase and timing of a signal without boosting or cutting any particular frequency range the way a normal filter would. On its own it is subtle. But when you chain several all-pass stages together, they start to smear transients and spread the sound out in time. That smearing is the core of what makes something sound like reverb instead of a dry signal.
If you want a deeper look at the module itself before building, see the All-Pass Delay topic hub and my All-Pass Delay module guide. The same module is also great for custom filter shapes, not just reverb.
A dry piano, for example, becomes soft and ambient after passing through a few all-pass stages. The effect works best on sustained, gentle material.
The One Rule: Avoid Simple Multiples #
Here is the single most important idea in this whole lesson:
The delay times of the all-pass stages must not be simple multiples of each other.
Why multiples sound like an echo #
If you set three all-pass delays to:
- 100 ms
- 200 ms
- 300 ms
the taps line up. 200 is two times 100, 300 is three times 100, so the repeats reinforce each other at regular spacing. The result sounds like a feedback delay or a rhythmic echo, not a reverb. This is expected behavior, and it is great if an echo is what you want.
Why irregular timing sounds like reverb #
For a reverb we want the opposite: a diffuse, smeared, stretched, non-periodic response. That needs delay times that do not share simple relationships. Even a handful of irregular values already sounds far more natural:
- 9 ms
- 38 ms
- 71 ms
- 110 ms
- 149 ms
Add more stages and the diffusion gets denser. The hard part is that these interactions are not obvious by eye. You can accidentally pick three values that secretly reinforce each other and you will not see it, you will only hear the buildup.
Build the Patch #
Start simple. You can get a usable short reverb with nothing but a chain of all-pass delays.
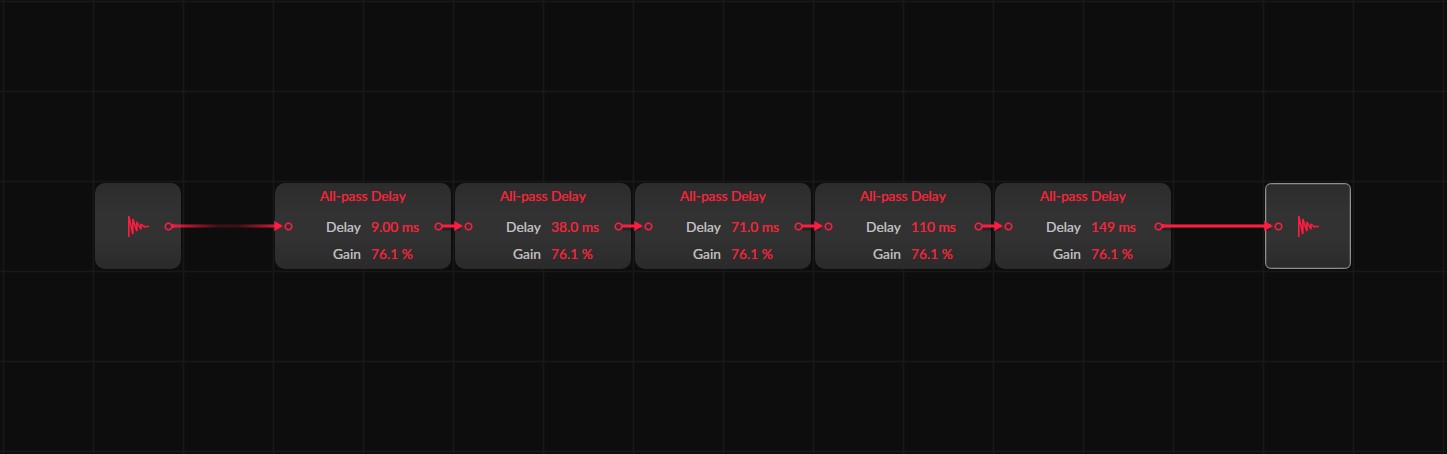
- Add an FX Grid on the track you want to add space to (a quiet, dry source like a piano works great for testing).
- From Audio In, go into the first all-pass delay stage.
- Chain several more all-pass stages in series after it.
- Give each stage an uneven delay time that is not a multiple of the others. Try something like 9, 38, 71, 110, 149 ms to start.
- Send the last stage into Audio Out.
- Use the device Mix knob to blend the wet diffusion back with the dry signal.
Even with no feedback, this already gives you a short, smeared reverb texture. Listen for whether it feels like diffusion rather than echo. If you hear distinct repeats, your times are too related; nudge them.
Choosing Good Delay Times #
Picking these values by hand is genuinely awkward, because you cannot see the relationships between stages. To make this easier I built an all-pass reverb calculator that generates a table of unevenly spaced delay times for you.
It has controls for:
- Preset type such as room, plate, hall, or shimmer
- Start delay for the first stage
- End delay for the last stage
- Spacing curve for how the values spread across that range
- Randomness and a seed so you can generate alternate distributions
- Minimum gap so two stages never land too close together
You copy the generated numbers into each all-pass module by hand. There is no preset export yet, so it is manual. Also note that the Grid rounds the displayed delay value after you type it, but it still uses your exact typed decimal internally, so do not worry if the visible number looks slightly off.
Make It Longer and More Alive #
A pure series of all-pass stages gives you a short reverb. A few additions take it much further.
Extend the tail #
Route some of the output back toward the input through a delay or recirculating structure. That feedback path is what turns a short smear into a long reverb tail. Keep the feedback under control, the same way we did in the self-running feedback patch, or it will run away.
Add a chorus #
Put a Chorus in the feedback or recirculation path. Chorus introduces slight, slow modulation of the delay times, which adds:
- subtle pitch movement
- width
- animation
- extra smearing
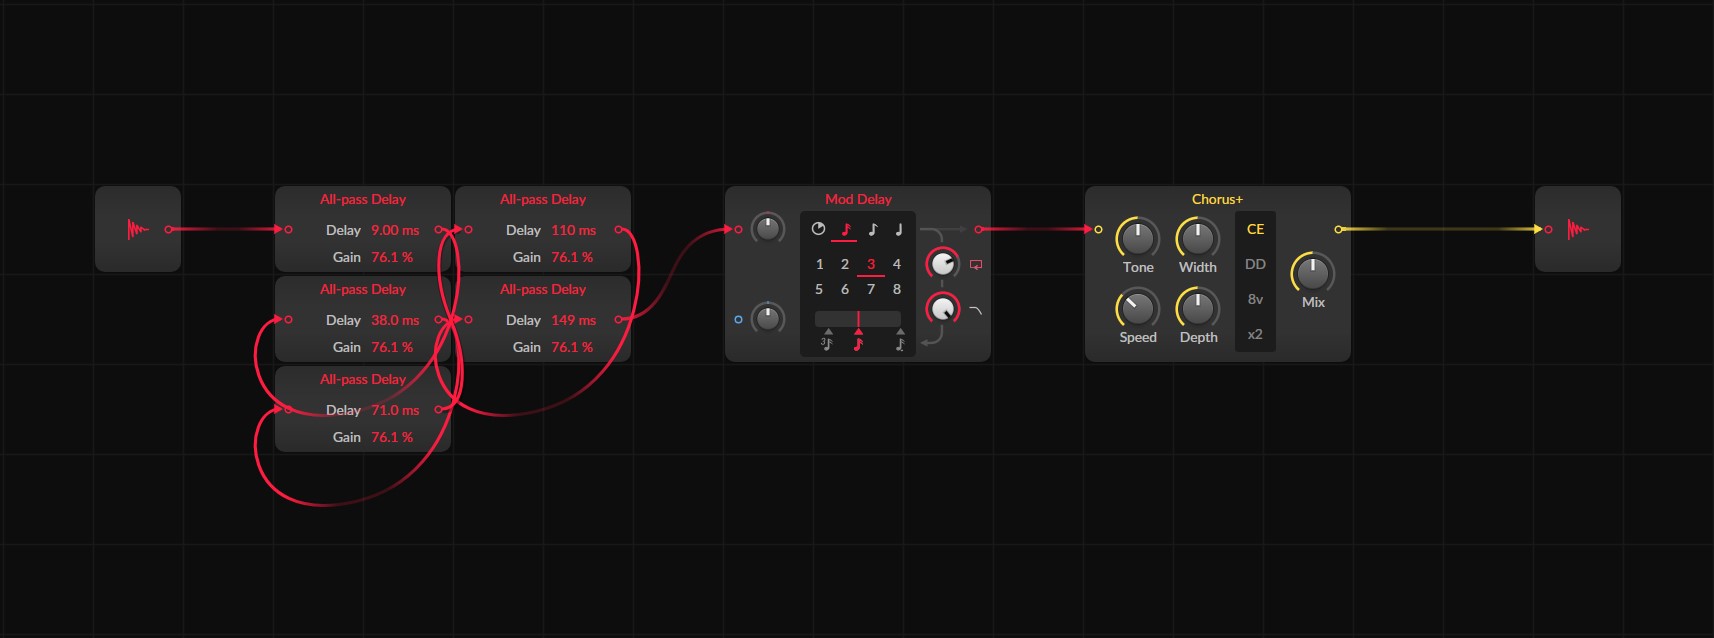
A modulated network almost always sounds smoother and more spacious than a perfectly static one.
Shape the tone #
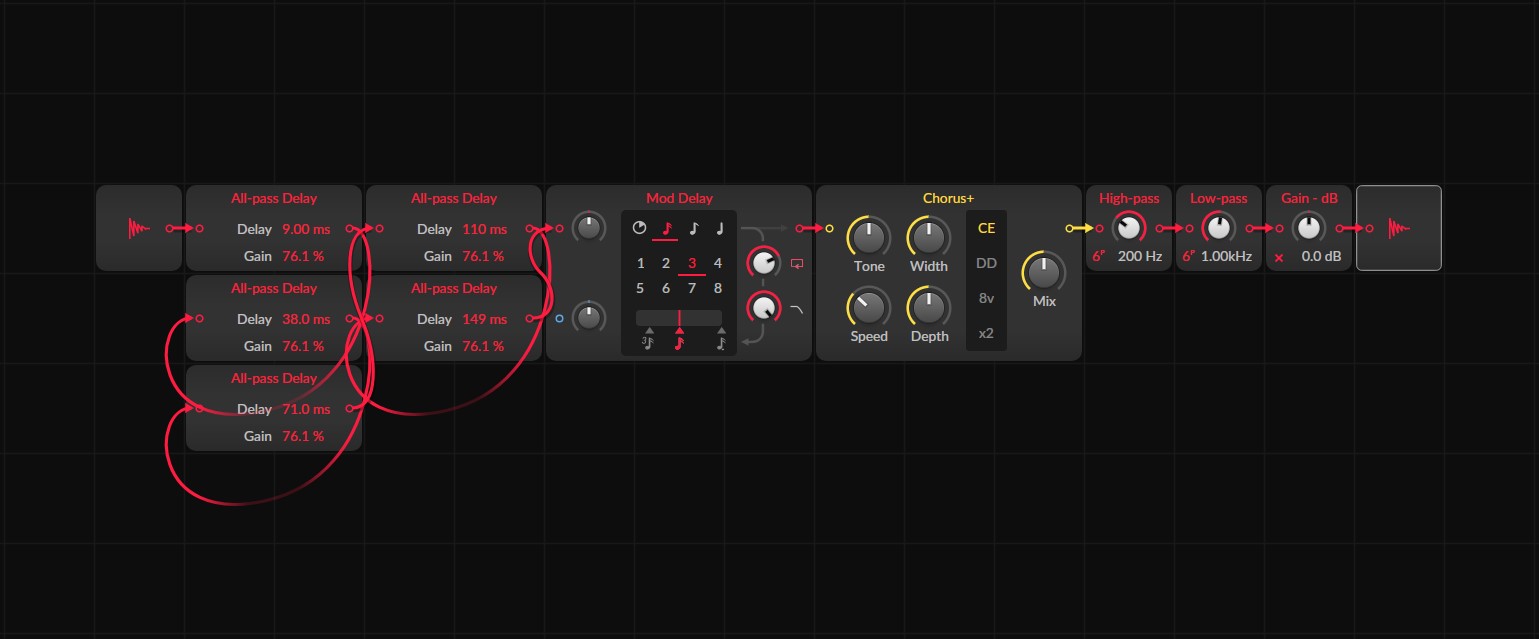
Finish the chain with filters:
- A high-pass filter to remove low-end buildup and mud.
- A low-pass filter to soften harsh highs.
Then a Gain module to make up the level the diffusion network loses.
A More Layered Network #
For a denser, slow-blooming ambient reverb, use several diffusion lines in sequence with mixing between them:
- Audio In
- High-pass filter
- Optional pitch shifter for a shimmer effect (mix 50% maybe)
- First all-pass diffusion line
- Blend / Mixer
- Low-pass and high-pass filtering
- Audio Out
At the same time,
- send part of the signal from the mixer back through a chorus,
- into a second diffusion line, another blend,
- a third diffusion line, and so on.
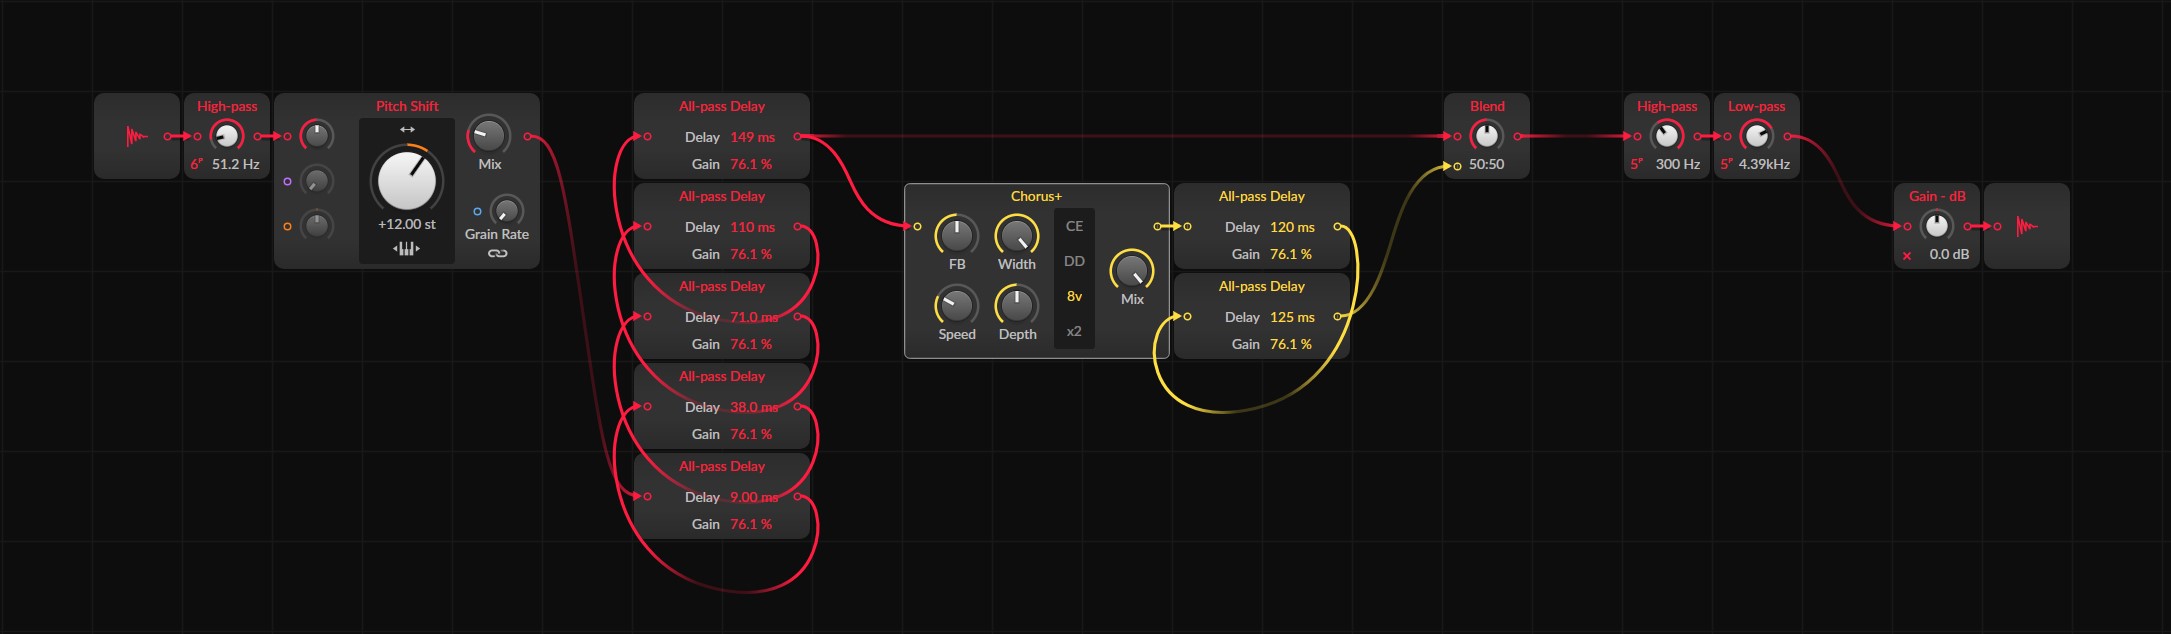
Each line is usually a bit longer than the previous one, but every line still has to avoid simple multiple relationships in its delay times.
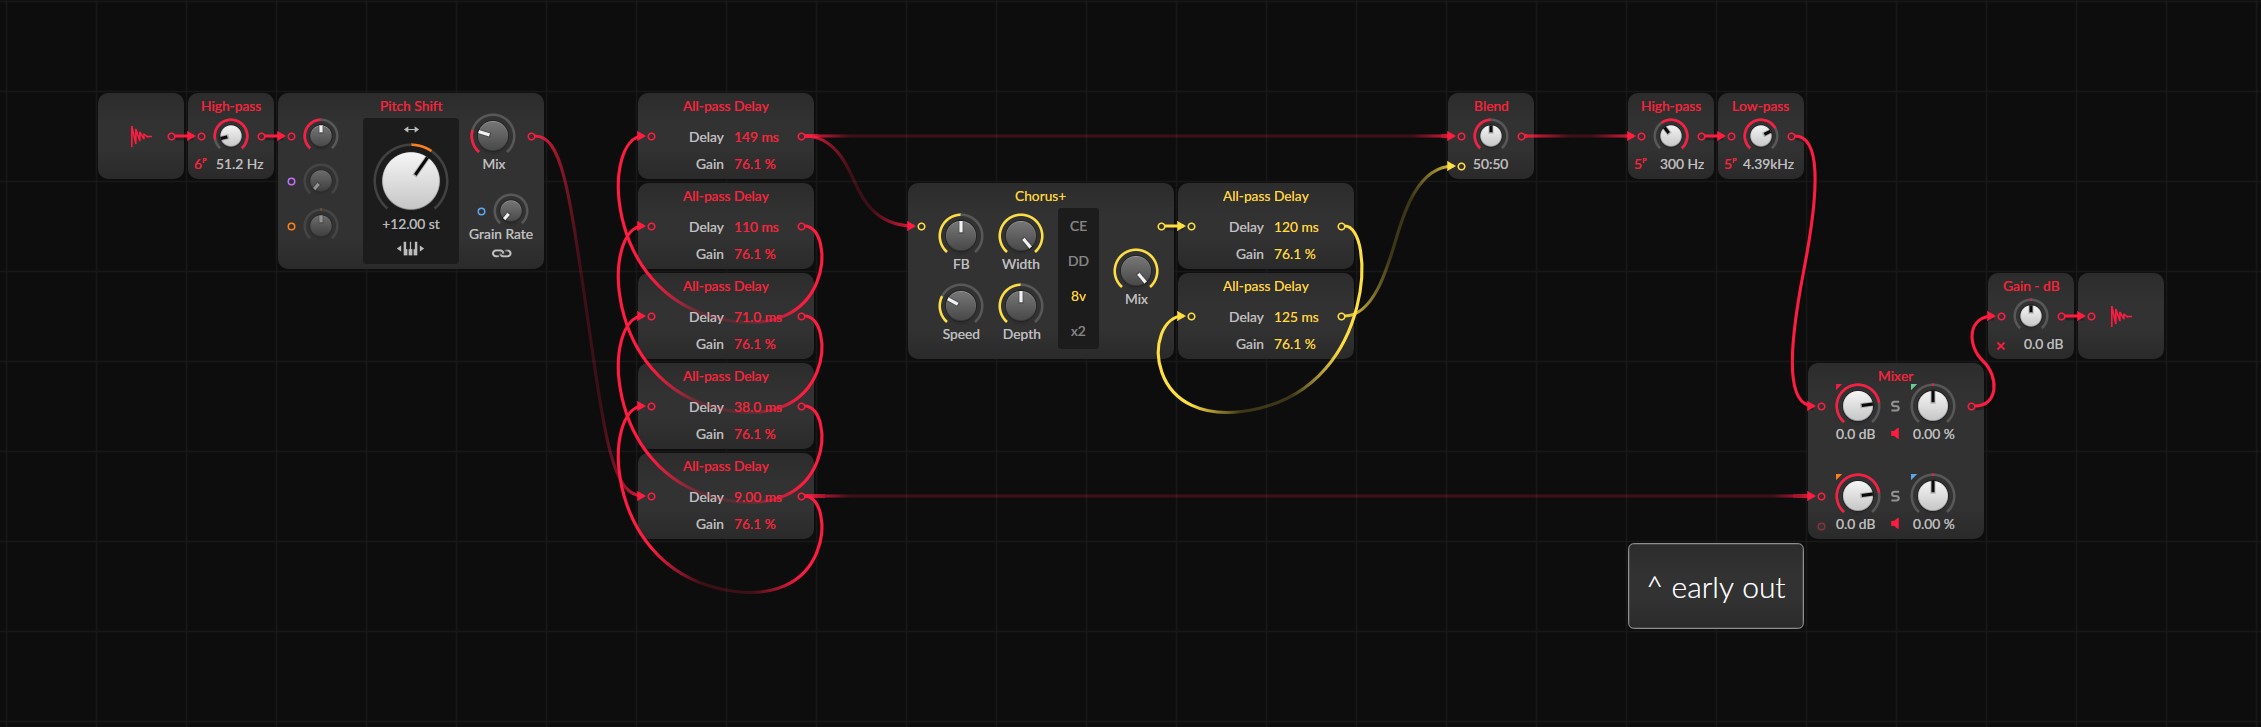
Keep an early output #
If the signal only appears after several long diffusion stages, the reverb feels disconnected from the note, you hear silence for a noticeable moment, then the tail. Fix this by taking an early output from the first diffusion line. That gives you an immediate early-reflection-like response while the deeper lines keep building the long tail behind it.
Why Build One at All #
Using a reverb plugin is completely valid. But building one from all-pass delays gives you something different: control over the underlying behavior. You get to shape diffusion directly, design unusual spatial textures, and actually understand why some reverbs sound smooth and others sound like delays. For ambient and generative patches it is also CPU-light and lives right inside your patch.
The limits are real too: it takes manual tuning, bad delay choices fall apart into obvious echoes quickly, and a fully convincing reverb usually needs more stages than you would expect. But even a compact setup sounds surprisingly good once the timing relationships are chosen with care.
Small Variations #
- Swap the preset type in the all-pass reverb calculator (room, plate, hall, shimmer) and paste in fresh values.
- Change the seed to get a different but equally valid distribution.
- Add a pitch shifter before the diffusion for a shimmer reverb.
- Modulate the Mix or feedback amount slowly for an evolving space.
- Save your favorite network as a preset to reuse in tracks later.
If you want the full walkthrough with audio examples and the calculator on screen, watch the all-pass reverb video.
▶ Next Lesson: FX Grid: Custom Filters
◀ Previous Lesson: FX Grid: Building Audio Effects
▲ Bitwig Grid Course Overview