Mastering
Production Techniques
Mastering is the final stage where the whole track is checked as one finished piece. Instead of focusing on one synth or one drum bus, you are listening to the overall translation, balance, and release-readiness of the mix.
That does not mean mastering can rescue a broken production. Most of the important work still happens in the composition, sound design, and mix.
What mastering usually tries to achieve
- consistent tonal balance
- controlled final peaks
- appropriate loudness
- reliable playback on different systems
- a finished presentation for release
A useful way to think about it
Mastering is quality control plus light final shaping. If the mix already works, mastering can help it travel better. If the mix is confused, mastering often only makes the confusion louder.
So the healthiest mindset is not "make it loud at all costs." It is "make the finished track translate and hold together outside the project session."
Also matches: final master, mastering, premaster, master
Posts in this topic

In this video, I showcased the TEOTE plug-in by Voxango and explained why I think it's useful. I showed how I use it to reduce and push frequencies on my drum bus and how you can change the profile and bands. I also explained the dynamic section, with the FX knob and Mastering button, as well as the low cut and high cut, room dip and boost threshold. Finally, I shared my experience using the plug-in on drums and the master bus, and why I think it is great for rougher estimations or matchings.
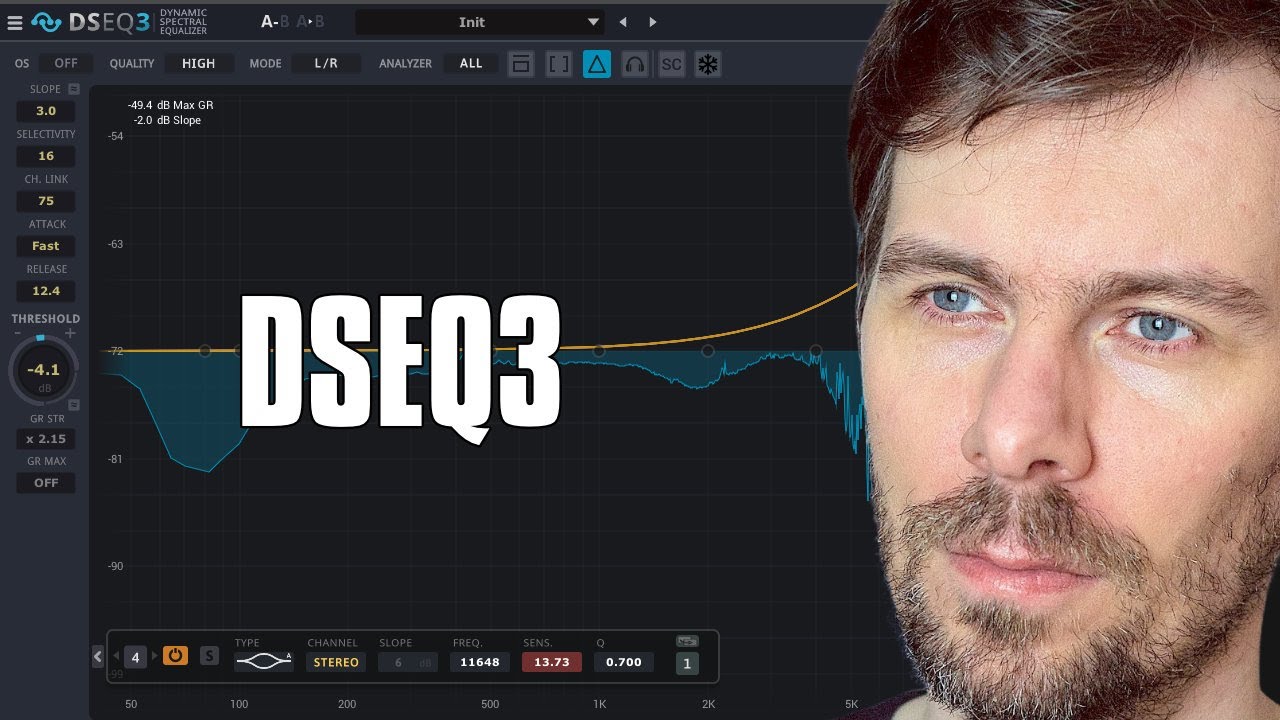
In this video, I talk about the DSEQ3 by TB Pro Audio, a dynamic spectral equalizer. I explain how the pre-filter helps to filter out low frequencies, and how the analyzer catches what’s above the threshold line and reduces it with the compressor. I also explain how the selectivity works, as well as the slope and the over sampling. I demonstrate how this can be used in mastering, and how it can be used creatively for sound design. Finally, I recommend trying out the demo version available on the website.

Learn what crest factor means in mixing and mastering, how to measure compression, and how to compare track dynamics more accurately.

In this video, I provide updates to my Hard Clip and Auto Level presets, both of which are now available for free download with new features like LED clipping indicators and improved functionality. I've introduced options such as different clipping modes, band splitting, and a stereo link feature, while addressing phase shift issues and incorporating spectral-based solutions. Additionally, for the Auto Level preset, I added features such as an amount knob and stereo link, and I shared an experimental Auto Level Plus version for quick mastering solutions.

In this video, I attempted to replicate the Newfangled Audio's Elevate plugin using Bitwig Studio by creating a similar mastering setup with a filter bank, compressor, and clipper. I utilized impulse responses for band splitting, which helped maintain CPU efficiency, and included modular options for compression and limiting to tailor the audio to personal taste. The project file is available for download in the description for viewers to try and provide feedback.

Polarity MD is a newly released, completely free multiband dynamics plugin featuring four-band OTT-style compression with both upward and downward compression, as well as clippers on each band and the input and output. Compatible with all major platforms and plugin formats, it has a user-friendly, web-based interface and is designed to make tracks louder and more controlled with minimal setup. The plugin is currently in beta, available for download, and the developer welcomes feedback and suggestions to improve its performance and features.

In this video, I demonstrate my workflow for gain staging a track. I start by going to the settings and changing the default new track volume to 0dB. I then select all of the tracks and set them to 0dB in the inspector. I then group the tracks together into meaningful subgroups like drums, bass, and music. I then gain stage all of the tracks, starting with the kick, by using the peak limiter to bring the volume up to the ceiling of the threshold. I then apply different gain staging methods, like limiters and clippers, to the different subgroups. Finally, I bring all of the subgroups together into an "all" group, which is my master chain, and use a track reference track to compare my track to.

In this video, I create a new track from scratch in Bitwig Studio 6 beta, showcasing the new automation improvements and demonstrating my workflow for building sounds, melodies, and drums step by step. I experiment with vocals, synths, and various effects to craft an atmospheric vibe, while balancing and mixing each element live as the track evolves. The project is left unfinished, focusing on creative exploration rather than perfection, and the session will be available for download on my Patreon.

In this video, I discuss the EQ Three by TP Pro audio, emphasizing that it is often overlooked due to the lack of advertisements or sponsored videos. I demonstrate various ways to use the EQ, such as as a track spacer or a spectral gate. Additionally, I explain how it can be utilized as a "magic cue" or an analyzer for comparing frequency distributions between tracks.

In this video, I showed what the new Smart EQ 3 plug-in from Sonible from Austria can do. I tested it out on my own track called Craft and went through how to use it for drums, bass, and the master. I showed how to apply different profiles and manual EQ, as well as how to use the grouping feature to make sure the tracks work well together. I also mentioned that Smart EQ 3 is aware of the context EQing and prioritizes certain things over others. Lastly, I suggested that users try out the trial version to get a feel for the plug-in, and if they like it, to purchase it.

Music production is best learned through hands-on experience, making mistakes, and developing your own taste, rather than relying on paid courses, tutorials, or expensive gear, which often give you the illusion of knowledge without real understanding. Focusing too much on harmony theory, mixing, mastering, or specific genres early on distracts from what matters most: regularly finishing tracks and learning from each attempt. Ultimately, the process should be about making music you enjoy, not seeking validation or following fixed rules, because true growth comes from persistence and personal exploration.

Today I compared three spectral compressors, DSEQ3, Spectral Compressor, and Spectraft, explaining my preferences, typical use cases, and cautioning against overuse due to their potential to strip music of its character. I prefer DSEQ3 for its smart AI features, custom threshold curves, and affordability, but use Spectral Compressor mostly for spectral sidechaining and find Spectraft to be the most versatile, albeit pricey. Ultimately, I advise subtlety with these tools, emphasizing that a well-balanced mix done at the track level always sounds better than heavily processing the master.

In this video, I talk about three new plugins by Sonoble that just came out today: Pure Verb, Pure Comp, and Pure Limit. These are smaller versions of their bigger plugins, which have fewer controls. These plugins are perfect for creative people who want to dial in a few parameters and move on. I demonstrate how to use each plugin and offer some tips along the way. These plugins are a great addition to any mixing or mastering workflow, especially for those who want to simplify the process. If you're interested, check out the links in the description to try them out for yourself.

Polarity MD is a powerful, free multi-band dynamics plugin featuring four bands with downward and upward compressors, a clipper, and a range of global controls, now updated with oversampling, linear phase crossovers, normalization, and improved output matching features. This version offers expanded compatibility with various Linux distributions and enhancements like soloing bands, accessibility improvements, and resizable interface with saved window states. Users are invited to test the latest Beta 9, report bugs or requests, and enjoy a robust mastering tool without registration or cost.

In this video, I showed how to make a dance floor track out of an 8 bar loop. I began by listening to the track and removing some of the plug-ins and then creating an intro. I used some automation and randomization to make the most out of what I had, and then I added a lead melody and some drums and percussion. I also used some FX and modulation to emphasize the drop and add some variation to the track. Finally, I added a straight hi-hat to emphasize the speed.

In the video, I demonstrated how to set up an XO preset in Bitwig Studio to avoid muting and unmuting the return channel. By muting the individual buses and leaving the master channel untouched, you can hear the preview of samples without any audio leakage. Additionally, I showed how to create a mono bass sound using the Serum wave table editor, removing the fundamental and replacing it with a stable mono sine wave, while still maintaining a stereo spread on top.

In this video, I discussed why it's important to balance your frequencies before going into a limiter or clipper. I showed how to do this easily by using a tilt setting, or by using a VST plugin like Ozone 8 and using the Matching EQ feature. I also showed a method of using multiple band pass filters with a reference level tool to reach the same goal. Finally, I discussed the importance of not overdoing the brightness as it can lead to an overly sharp mix.

Polarity MD update adds a native GUI, linear-phase crossovers, per-band clip thresholds, and better scaling for faster, clearer multiband compression.